Showing posts with label Erika. Show all posts

Monday, January 19, 2015

Make a Card Monday

 http://lillgumman.blogspot.se/
Hello everyone!
Today I am sharing a new Make A Card Monday project with you. The card today is as usual a very clean and simple card that is easy and fast to make.


To make this card I stamped the background on the edge of a white cardstock, then I also stamped my sentiment in the opposite corner using the same ink. To make the teal ink pop out more I matted the white cardstock on a black background and then adhered all of it to a white cardbase. Afterwards I realized that the white cardbase didn't really bring it all together the way I wanted, to I added the teal ink to the edge of the card base to tie it all together better.

Here is a closeup of the card:


So that was all for me today, I hope you liked my card and the video and if you want to get any of the products I used check out the complete supply list with links to the shop in the bottom of this post.

Erika Winterlia

-------------------------
Supplies used:


Flowers and Dots - 3 Background stamps
General Sayings II - 15 stamps "English Sentiments" 
Cardstock - 10 sheets à 210 x 297 mm 300g - pearl white 
Distess ink - Peacock Feathers 

Sunday, December 14, 2014

A tag for Christmas

 http://lillgumman.blogspot.se/
Hello everyone it's Erika here again with a new project to share. This time I just have a super simple Christmas Tag that you can easily make if you need something to hang on a present or something like that.


This is the tag I have made for today:

It's really simple, and it actually looks much better in real life than i photos. The shimmer didn't pick up right on camera and made the colors all wrong. But maybe you'll still get the idea.

I made this using the This is December - stamp set from the shop. I still haven't cut this down so I have all of the stamps still connected and used the whole sheet like a background stamp. Then I just embossed it with clear embossing powder and used Distress Stain and Spray Inks on top to get the color. Since the embossing will resist the ink I can still see my stamping even after all of the inking.

I do think it would look great if you stamped or embossed the sentiments in white also, that might even be much better than this.


Here is a closeup of the tag:

So that was all for me today, I hope you liked the tag and if you are interested in any of the products I used, take a look at the links below.

Erika Winterlia

---------------------------
Products used:
This is December - set of 13 stamps "English Sentiments

Saturday, November 29, 2014

Scrap Your Stash


 http://lillgumman.blogspot.se/
Hello everyone it's Erika here again with another card for you. Today is Saturday and it's time for Scrap Your Stash. I made a few cards during the week and had some left over pieces that I decided to use for the card today.


This is the card I have done for today:

This is a really simple card that I made using a circle from spellbinders, the large banner trio dies from Whiff of Joy and the Christmas sentiment from Whiff of Joy. I love these circle stamps, I think they work so well on almost any card.

As a finishing touch I added some ink splatter with my Distress Spray and also wrapped a piece of twine around the front.


Here is a closeup of the card:

So that was all for me today, I hope you liked my card and if you are interested in any of the products I used, take a look at the links below.

Erika Winterlia

---------------------------
Products used:
Festive Occasions- set of 9 stamps "English Sentiments"
Cute Banners trio - 3 dies

Friday, October 17, 2014

Color me happy


 http://lillgumman.blogspot.se/
Hello everyone it Erika here again with another card for you. Today is coloring time and I have used an image of a super cute giraffe that I just couldn't keep myself from falling in love with. I think this little guy is adorable.


This is the card I have done for today:

This is a pretty simple card without a lot of detail, but I made it this way since I wanted all the focus to be on the colored image. As usual I used my Copic Markers to color this image and I used some yellows tones, some earth tones and also some gray and teal. Since this image is very small and detailed it is hard to do proper blending with the markers so what I do in situations like this is to use only two colors. First I color with the lighter shade and then carefully dab the darker colors where needed and then I go over the whole thing again with the lighter one to blend. For small spaces you don't need anything else than this and it will still look good.

I cut out my image using a new die set from Spellbinders which also can cut tiny little holes. I love this stitched effect. The sentiment is one that I reach for a lot. I think it's very versatile and easy to use.

As a finishing touch I added some shimmer with my Wink of Stella pen to the clothes.


Here is a closeup of the card:

So that was all for me today, I hope you liked my card and if you are interested in any of the products I used, take a look at the links below.

Erika Winterlia

---------------------------
Products used:
Claude Celebrating Giraffe 
Birthday Phrases - Set of 8 - English Sentiments 
Cardstock - 10 sheets à 210 x 297 mm 300g - dark grey 
Cardstock - 10 sheets à 210 x 297 mm 300g - weiss 

Monday, September 29, 2014

Make a Card Monday

 http://lillgumman.blogspot.se/
Hello everyone!
Today I am back with another Make A Card Monday project. Today I am sharing a simple card using a stamp from the "You are my hero" stamp set.


To make this card I a few patterned papers that I had laying around. I don't know where they are from and they are probably really old. The paint splatter is made using my Dylusions Spray Inks. I cut a large circle from one of the patterned papers and then I also cut two small strips of matching paper and cut them to a banner end. For my sentiment I used the circle in the stamp set that said "Reach for the starts and dare to dream". This sentiment had a lot of arrows around it as well, but after I had cut the circle out with a punch I felt like the starts didn't really match the rest of my card. So I used a scissor to cut away the stars before I adhered it to my card.

Here is a closeup of the card:


I have also uploaded a tutorial video that you can find on my YouTube channel or here below.


YouTube Video:

So that was all for me today, I hope you liked my card and the video and if you want to get any of the products I used check out the complete supply list with links to the shop in the bottom of this post.

Erika Winterlia

-------------------------
Supplies used:


You are my hero! - Set of 9 stamps
Cardstock - 10 sheets à 210 x 297 mm 300g - pearl white 
Archival Ink - Jet Black  

Sunday, August 17, 2014

My Crafty Space


 http://lillgumman.blogspot.se/
Hello everyone!
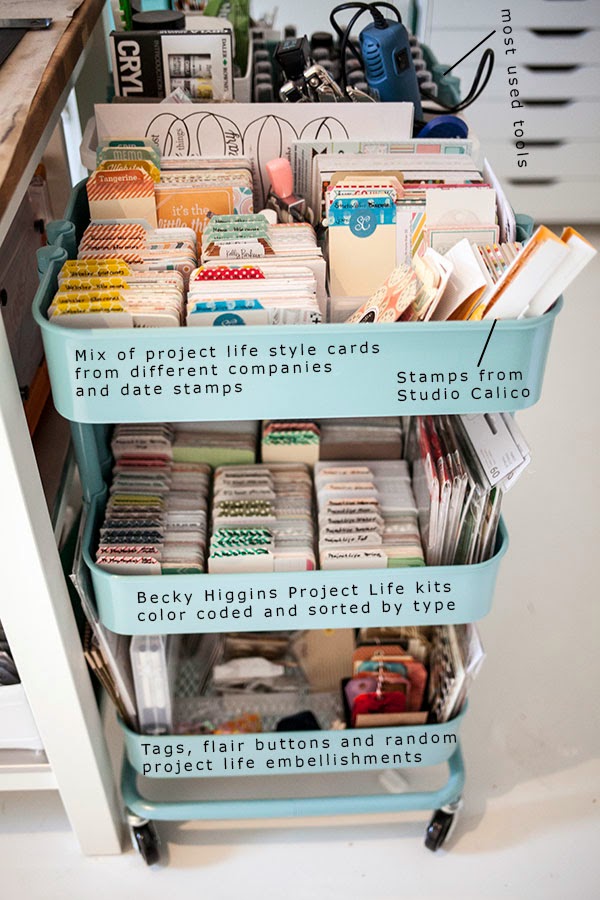
Today it is time for me to share my craft space with you and I have recently finished my whole room and I have to say I love to spend time in my craft room/office. Most of the furniture and decor in my room are from IKEA, which I think is a great and budget friendly option. They have plenty of furniture and storage solutions that work perfectly for craft supplies. 


Here is a view of my room from where I enter the room. In the front you can see my two Råskog carts where I store my Project Life materials and my Art Journaling stuff. 

Next to the carts are my work desk where I stand. In the different boxes under the desk is some materials and tools that I use a lot while crafting.

And to the right of my desk (which is in the center of the room) is a shelf unit where I store some random stuff and my albums.

Here is a closeup of my Project Life Cart and Art Journal cart:


Here is a photo of the shelf unit (Expedit from IKEA) where I store my albums, some random stuff and things I have an extra copy or two of.


Next to the Expedit unit I have an Alex drawer unit. I use this as my die cutting station:


On the left side of my work desk I have another Expedit unit on top of a drawer unit. Here I store my most used cardstock, Tim Holtz stamps and some other random stuff. I also have a few binders with different inventory solutions so I can easily keep track of the stuff I own. In the blue boxes I store stencils, alphabet stickers and other stickers. I also have some extra albums here that didn't fit in the other shelf. And inside the top drawers I store all of my chipboard pieces and alphabets:


In the left drawer I store my clearstamps and my thin dies. I use Avery Elle stamp storage pockets to store my stamps. They are sorted in alphabetical order and by company, but I still need to make dividers for them. The dies are stored by theme in plastic CD pockets. I also store my clear blocks in this drawer:


In the right middle drawer I store some stamps from gel-a-tin since I didn't want to remove them from their tins and put them in storage pockets. I also store my inks, stamp cleaners and other often used stuff in there. Here is a closeup of the drawer:

The final drawer in this unit is used to store stamp inks and reinkers:

Here is the office part of my room and this is where I spend the most time. Here I have my computer, my printer and all of the office and gaming related stuff that I need for work and for gaming. (I play loads of computer games).


On the right side of my computer is my printer and my Silhouette (yes I do have the first one they released, but it works just fine). In the drawers and cabins underneath is stuff for my computer and all of the office supplies and gaming equipment. (I still haven't had the energy to put the handles on the doors and drawers, but I'll get there eventually).

On the left side of the computer is a spot for my sewing machine. This is also where I take all my card photos.

In the corner is a shelf unit with this spinning wheel in it. I store random embellishments and extra Project Life cards here.

Ok, so lets turn around and face the door where we entered the room. Here you can see my work desk from the other side and here I have two chair where I can sit and work and have friends over. I also covered my desk with paper so I don't ruin the desktop when painting. I'll paint the top of the desk with the same color I have on the floor when I get the time. Here you can see my somewhat temporary Copic Marker storage too.

I store my Copic Markers in old (clean) cat food containers. They are sorted by color.

Closest to the door is an old shelf unit that we had in out living room before. I "stole" it and now I use it to store some random items and extra materials that I have. I also have two DVD units next to it where I store all of my cling mounted stamps (except the Tim Holz ones which I store in the large Expedite shelf).

In the bottom cabin I store extra journals, all of my papers, materials for shipping and some extra cardstock.


And finally I have a small shelf next to my door where I store my stickles, liquid pearls and Distress Markers and other colored pens. (Yes I did spell liquid wrong on the photo, no idea where that e came from. Sometimes my hands work faster than my brain.)


So that was my craft room and a seriously long post, but I hope you liked it. If you want to you can also check out my room tour on YouTube.


So that was all for me today, I hope you liked my room and got some inspiration on how to store your products.

Erika Winterlia

Tuesday, July 29, 2014

Tag, you're it


 http://lillgumman.blogspot.se/
Hello everyone!
Today is Tuesday and that means another "Tag, you're it"-theme.

"Tag You're It Tuesday" means that a member of the Whiff of Joy team gets to surf the web and all the social media spots for someone special who inspires them to create something similar. We find our projects on our facebook page, pinterest or the challenge entries. So if you are sharing a Whiff of Joy project through social medias tag us with @whiffofjoy or #whiffofjoy and we will find it. And maybe you'll be the next inspiration for "Tag You're It Tuesday"

So for my inspiration I found a beautiful card on Pinterest and contacted the owner of the photo but unfortunately I never heard anything back. So I kept looking for more inspirations and after I had contacted four different people asking to feature their card here on the blog I was out of time and had to do the post. I guess a lot of people are on vacation now since it is in the middle of summer. But I didn't want to keep this page empty so I still went ahead and made a card using all of the inspiration I had found.


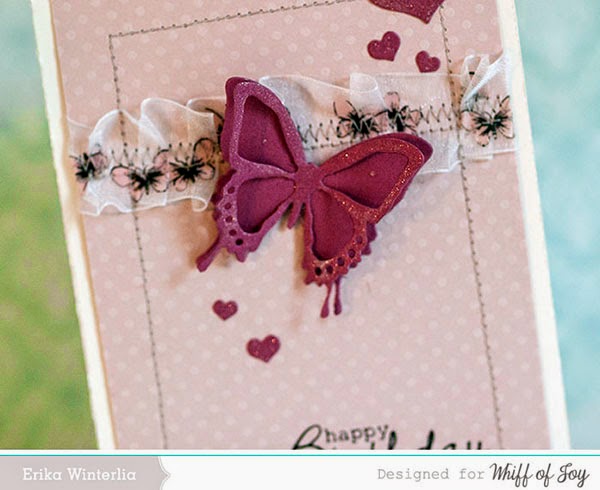
To make this card I used paper from Bazzil and some old ribbon I had in my stash. I also diecut some hearts from the Hearts Die-Light and what card is complete without a few butterflies? The butterflies are from the Large Butterfly Die-Light and the stamp is from the Birthday Phrases stamp set.

Here is a closeup of the card:

So that was all for me today, I hope you liked my card even though I wasn't able to show you my inspiration. And as usual, all of the products I used can be found in supply list below.

Erika Winterlia

-------------------------
Supplies used:
Large Butterflies - Set of 4 dies 
Hearts Die-Lights - set of 6 

Birthday Phrases - Set of 8 - English Sentiments 

Tuesday, June 17, 2014

Tag You're It Tuesday


 http://lillgumman.blogspot.se/
Hello everyone!
Today is Tuesday and that means another "Tag, you're it"-theme.

"Tag You're It Tuesday" means that a member of the Whiff of Joy team gets to surf the web and all the social media spots for someone special who inspires them to create something similar. We find our projects on our facebook page, pinterest or the challenge entries. So if you are sharing a Whiff of Joy project through social medias tag us with @whiffofjoy or #whiffofjoy and we will find it. And maybe you'll be the next inspiration for "Tag You're It Tuesday"

So for my inspiration I found this beautiful tag on Papirdama's blog. I fell in love with the pink vintage style and though I just had to do something similar.


I wanted to make a card with the same romantic and vintage feel to it and this is what I came up with:

To make this card I used some tissue paper from Tim Holtz and also my Walnut Stain Distress ink. Then I stamped my sentiment on a heart that I cut out using the Nested Hearts die set. I also brought out some old ribbons that I had and made a bow from one of them. I adhered the bow with one of the pink brads from Whiff of Joy and as a final touch I just added some flowers to the base of the heart.

Here is a closeup of the card:

So that was all for me today, I hope you liked my card and the video and if you want to get any of the products I used check out the complete supply list with links to the shop in the bottom of this post.

Erika Winterlia

-------------------------
Supplies used:
Pearl Brads - Pink Basics 
Nested Hearts Die-lights - set of 5 
Box of Charms 14 - Owls 
Magical Wishes Sentiments Stamps - set of 9 
Distess ink - Walnut Stain 

Monday, May 26, 2014

Make a Card Monday

 http://lillgumman.blogspot.se/
Hello everyone!
Today I am back for another Make A Card Monday project. Today I'll be sharing a pretty simple and easy to make card using the lovely paper pad from Whiff of Joy and some arrow dies.


To make this card I used a the arrow die and die cut it twice, once to the arrows pointed to the right and the second time to the left. The sentiment is also from Whiff of Joy and it is one of my favorite sentiments. It can really be used for any type of card. As a final touch I added some twine around the front panel and adhered the piece with foam squares. Unfortunately the color of the twine didn't really match the patterned paper, but it was the best I could find and it'll have to do.

Here is a closeup of the card:

I have also uploaded a tutorial video that you can find on my YouTube channel or here below.


YouTube Video:

So that was all for me today, I hope you liked my card and the video and if you want to get any of the products I used check out the complete supply list with links to the shop in the bottom of this post.


Erika Winterlia

-------------------------
Supplies used:
Mini Arrows Die-Lights- set of 8
6x6 Paperkit - Frühlingserwachen 
Birthday Phrases - Set of 8 - English Sentiments 
Related Posts Plugin for WordPress, Blogger...