


 YOU WILL NEED:
flower punches - (I have used the smallest two EK Success retro flower punches for mine)
paper
glue
wire - (I use the green wires that I cut from my bought flowers before glueing them to my cards!)
1.
 To make one large and one small rose you will need four of each size of puched flower and two wires. I always cut the green flower stems off that come on the bought paper flowers I buy and save them to use for making my own.
2.
 First you will need to bend one end of each wire like so.
3.
 With a paper piercing tool or a pin make holes in the centres of all the flowers.
 With a paper piercing tool or a pin make holes in the centres of all the flowers.
4.
 With the flowers right side up cup them using an embossing tool.
 With the flowers right side up cup them using an embossing tool.
5.
 They will then look like the photo above.
 They will then look like the photo above.
6.
 Slide one of the paper flowers up to the bent over end of the wire and add some glue to the wire as shown.
 Slide one of the paper flowers up to the bent over end of the wire and add some glue to the wire as shown.
7.
 Curl one of the petals around the glued wire making a slight cone shape as shown.
 Curl one of the petals around the glued wire making a slight cone shape as shown.
8.
 Miss one petal out and then curl the next petal around the first as shown.
 Miss one petal out and then curl the next petal around the first as shown.
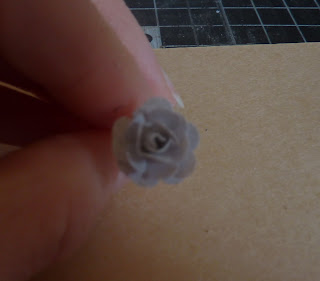
9.
 Curl the remaining three petals around the centre two as shown.
 Curl the remaining three petals around the centre two as shown.
10.
 Add some glue to the centre of another flower and glue underneath the rose centre you have made. Ensure that the petals are arranged in the gaps from the previous flower as shown.
 You should then have a flower that looks like the above photo.
 Add some glue to the centre of another flower and glue underneath the rose centre you have made. Ensure that the petals are arranged in the gaps from the previous flower as shown.
 You should then have a flower that looks like the above photo.
11.
 Repeat with the other two punched flowers, always making sure to arrange the petals in the gaps of the flower above.
 Repeat with the other two punched flowers, always making sure to arrange the petals in the gaps of the flower above.
12.
 Both sizes are made exactly the same. Here you can see the difference in the two sizes. Allow them to dry thoroughly before attaching to your project. You can also ink the edges of them once made to further enhanc as on my card below:
 The two flowers I made for the tutorial are on this card with the cute Henry Mouse: the small one on the heart tag and the larger one above the ribbon. I inked them both with a little walnut stain distress ink before attaching them to my card. I hope you have enjoyed my tutorial and I've inspired you to have a go at making your own paper roses! Thanks for looking!
Jane


hiya sweetie
ReplyDeletethanks for sharing hunni
there gorgeous
the card is so sweet
hugs angelique
Fabulous flowers Jane - you make it look so easy, but your fingers have magic in them!! Juliexx
ReplyDeleteПросто замечательный МК!!! Супер!!!
ReplyDeleteMerci pour ce joli tuto! bises. Nadine
ReplyDeleteLove how you did the flower Jane and the final card is fantastic!!
ReplyDeleteKatharina xx
Merci beaucoup pour ton partage et ce joli tuto. Bisous.
ReplyDeleteKathy
Jane I have only one word for your flowers and tutorial - AWESOME! Love it. Thanks for sharing. Hazel x
ReplyDeleteExcelenteee...
ReplyDeleteMe encantaron
Gracias por compartir
Great demo, thank you! Laura
ReplyDeleteTHANK YOU SOOOOO MUCH for the tutorial!!! Awesome! The pictures and instructions, step by step, makes it so easy to understand!!! And your flowers and card are GORGEOUS!! EXCELLENT job!!
ReplyDelete