


Hi all, here is Giò!!!!
Today I want to show you a tutorial to make a box with divisors that conteins a lot of Christmas tags.

You will need:
Whiff of Joy Cute Donkey for the sentiment;
Whiff of Joy Holy King for the sentiment;
Kraft and Ivory cardstock;
1 sheet Acetate;
Memento Tuxedo Black; White Ink; Copic Markers;
White embossing poweder; Heat tool;
Double sided tape; Glue Dots;
Ribbon; Charm; Button; white and kraft wire;
Paper trimmer, Score Board; Big Shot, Scissor.
Now you are ready!!!!


I decorate the bottom of the box with some stamps stamped in White.

Put a little bit of double sided adhesive on the little tags.

Turn the cardstock over and attach the double sided adhesive on the four borders.

First of all attach the little tags and then attach the other sides two by two.


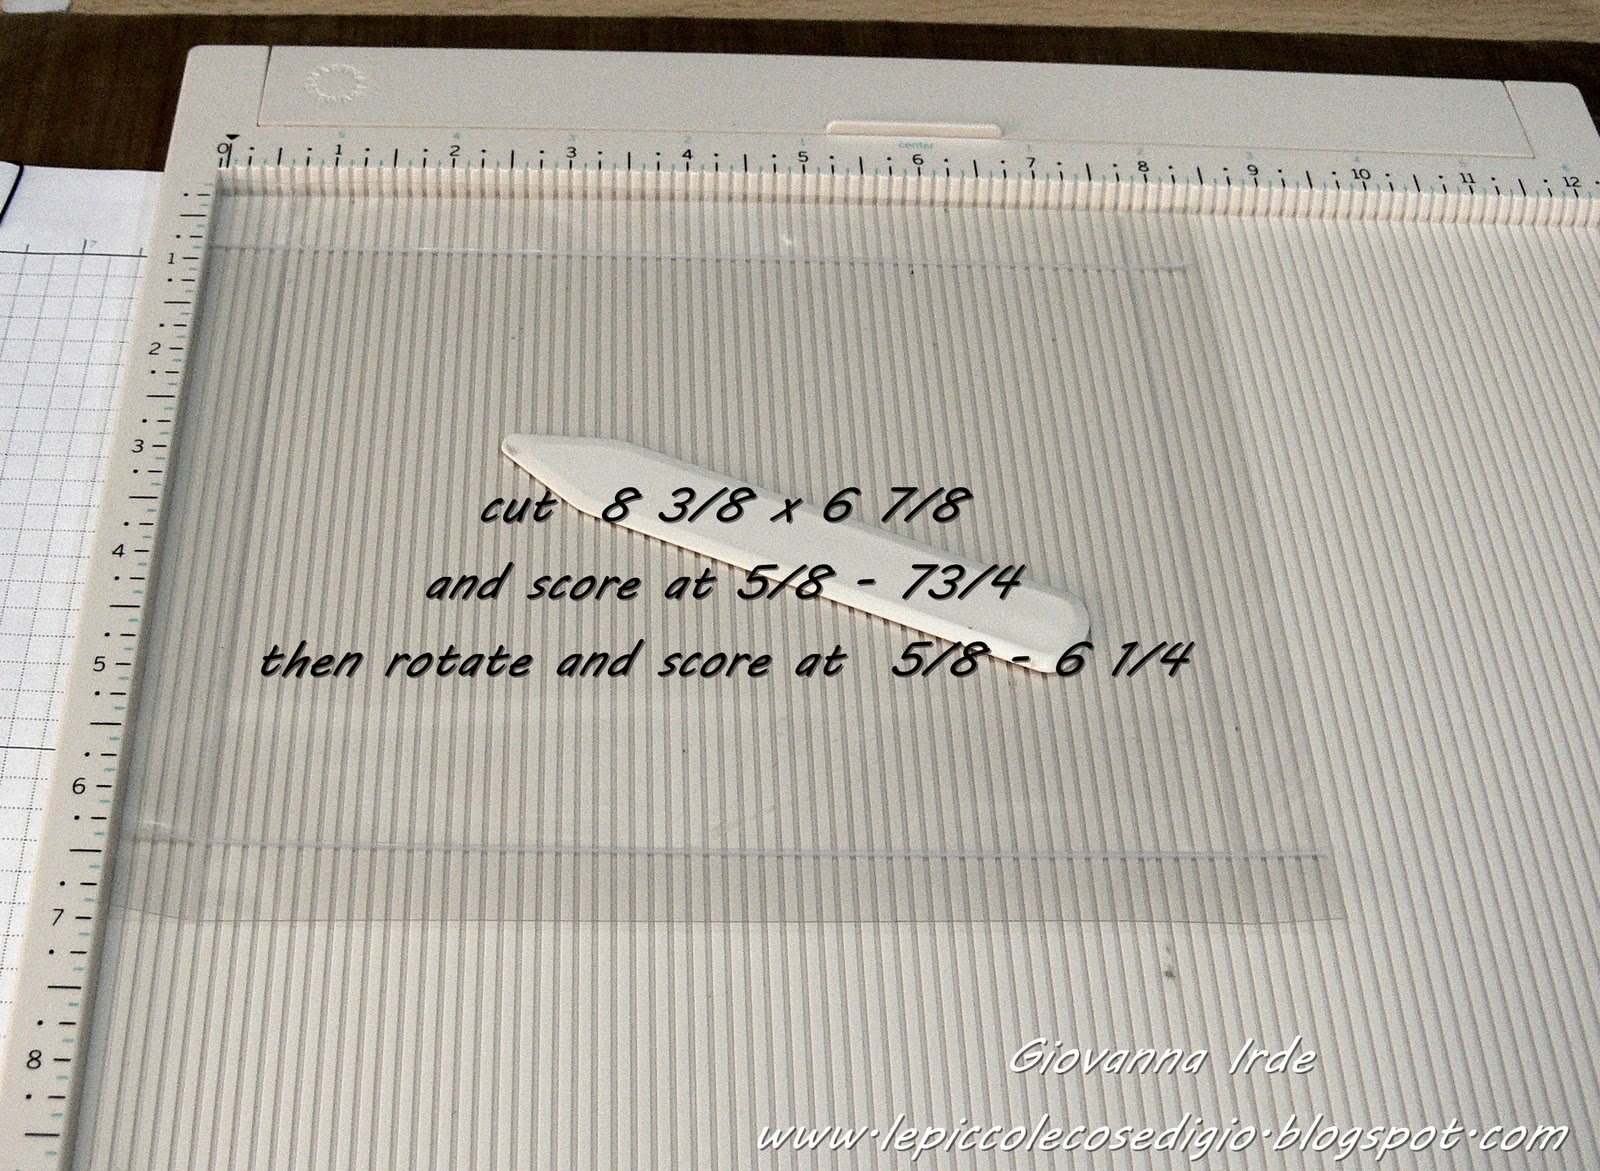
Now we make the divisors.


After scoring, put the double sided adhesive as in the photos.


Now you can insert the dividers on the box.

For the top of the box, used a sheet of Acetate.

To attach the borders of this top I used a Glue Dots.

I made 8 tags Kraft and 8 tags Ivory.
Stamp in White on Kraft and in Black on Ivory and then color with Copic Markers.


Position the clear plastic on cardstock and make two dots on the holes on the plastic.

Adjust the marks with the holes on the metal die and cut with your cutting machine.


With a little piece of natural wire your tag are completed, you don't have to do nothing only put them in the box.
I decorate the top of the box with ribbons and a bow, I also add a tag made with the Fancy Shape Die, the stamp is from Season's Greeting kit.
 I hope this tutorial would be simple and clear for you and I hope you will like it.
Thanks for stopping by.
Giò


Such a great tutorial, I just have one problem all is in inch's is it's possible to have some tutorial in metric too, just pleaseeeeeeeeeeeeeee:)
ReplyDeleteBeautiful work.
wow.. soooo fantastic.. thank you for the tutorial..
ReplyDeleteHugs, Katrin
Wow! A really gorgeous result and a very great tutorial.
ReplyDeleteThanks for that!
Hugs,
Eike
wow o wow what a brilliant tutorial.
ReplyDeletex laura x
That is an awesome idea, thanks for sharing
ReplyDeletePotevo esimermi dal lasciarti un commento anche qui? No, of course!!
ReplyDeleteLa tua maestria è ineguagliabile, il tuo estro non ha confini... avrò mica esagerato? Vabbè, forse un pizzico pomposa ma i complimenti te li meriti tutti! Brava continua così... anche con la dieta (chi la dura, la vince!). un pensiero positivo dalla tua fan più sfegatata. Eulalia
вау,супер)))спасибо огромное за урок)))))))))!!!!!!
ReplyDeleteCongratulations! I love tags!
ReplyDeleteHugs, Luciana.
Ciao Giò!
ReplyDeleteThe instructions are easy and very clear to understand. Thank you very much for this great tutorial.
I hope I will soon find some time to make this lovely project!
BIG hugs and have a nice weekend!
Pati
Génial ce tuto! Merci! Bises. Nadine
ReplyDeleteExcellent tutorial, extremely precise.
ReplyDeleteWhat a great idea!
ReplyDeleteThanks for the tutorial.
What an incredible tutorial, thank you so much for this. Jaqui x
ReplyDeleteWow, your Tutorial is absolutly great!!!
ReplyDeleteThanks so much for showing.
Dunja
Excellent tutorial!
ReplyDeleteThanks!
This is a very cool and very detailed tutorial...LOVE IT!!!
ReplyDeleteI love this - I am going to make this tonight and hope to get my tags done too. thanks !
ReplyDeleteHello Gio,
ReplyDeleteMy goodnes what a gorgeous box!!
Love the colours you used, so need
and what a brilliant idea for a give away
for my mother in low:)
Thanks for this
Wish you a lovely weekend.
Hugs
Sonja
This comment has been removed by the author.
ReplyDeleteBonjour,
ReplyDeletej'adore ce nouveau tutoriel.
Il est magnifique, tant dans la forme que dans les couleurs.
MERCI !
Bon W-End
Very nice and helpful, especially for beginners in this work
ReplyDelete... eine supertolle Geschenkidee :-)
ReplyDeleteUnd die Tags - einfach klasse.
Sag mal, mit was für einem Scorboard arbeitest du denn?
Gruß aus Deutschland
Martina