


Creating Airbrushed Backgrounds with the Copic ABS by Tori Hemingway
Today I will be showing you how I create sky and ground backgrounds on my cards using the Copic Airbrush System.
 For this project, you will need:
 For this project, you will need:
Copic Sketch Markers, Copic ABS with either air cans or compressor, your favorite nestie, scallop circle punch or nestie, Post it note, copy paper, and fine point scissors.
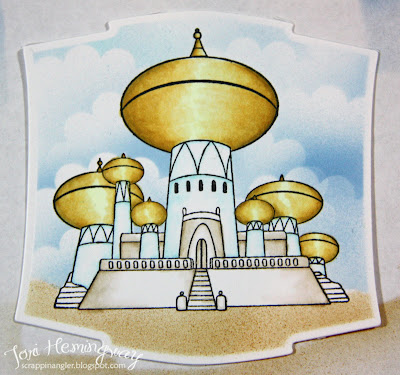
I started off by cutting my image out with a Nestability and leaving the Nestie in place so that I have a white border around the entire image when I am finished. Next, I color the image with my copics.
 I created a mask by stamping the image on copy paper and trimming around the lines very closely. For those of you not familiar with making masks, it is important to trim on or very close to the black outside lines because it will leave a white outline around the image if you do not. This is my mask after it is trimmed.
 Place the mask on top of the image. Some people like to affix with repositionable tape or stamp their image on post it notes. I just use the copy paper and hold it in place with my fingers. Once I have my mask placed, I use a post it note that I have ripped to create my horizon line. As you can see, I have used this one many times!
 Next, I use a scallop circle mask to create my clouds. I start from the top and work downward. I used B21 and my Copic Airbrush System (ABS). Holding the scallop mask in place, I airbrush around the scallop edges.
 Here is the left side after I finished it.
 Now the top is finished!
 To create the ground, I flipped the yellow mask around and secured it. Make sure that the mask on top of your image is still in place.
 I airbrushed the first layer with E31.
 I followed up the image with a very light layer of E39. My E39 marker is very juicy and tends to spatter when I airbrush with it, so it looks like sand. I hold it far away and let it spatter lightly. It adds so much texture to the ground. This is my finished image!And, here it is on my finished card!
 I hope you enjoyed my tutorial today! ~Tori


Just stunning! Very lovely card and nice tutorial, thank you.
ReplyDeleteFabulous! Thank you for sharing.
ReplyDeleteWow! Beautiful! Thank for you so much for sharing ;) I'll give it a try !!
ReplyDeleteHugs ;)
Very helpful tutorial! Great ideas for a lovely card. :)
ReplyDeletej'adore :)
ReplyDeleteVery nice card! Thanks for the tutorial.
ReplyDeleteAwesome card- love the airbrush tutorial! Beautiful card. TFS
ReplyDeleteFab tutorial! TFS! I still have to use my air brush system.
ReplyDeletexoxo,
Lori
i love this its soo cute. i use promarkers. i would love to be able to do something like this. x x
ReplyDeleteBeautiful card thanks for sharing
ReplyDeleteWhat a fantastic tutorial Tori!!! Thank you so much, I will use it for sure in the future.
ReplyDeleteKatharina x
I absolutely love this! Thanks so much! Your coloring is amazing! The shading is soo good it looks like metallic gold!
ReplyDeleteThank you for the tutorial. Your card is amazing!!!
ReplyDeleteHugs, Candy
I absolutely love the cloud effects! Thank you so much for sharing :)
ReplyDeleteBeautiful and really a nice tutorial. :) Thanks for sharing!
ReplyDelete