Hi sweet readers! It's Ingrid here. Today I want to share a birth card that I made. To embellish it I knitted a diaper and I'll show you how to do! I don't know if I use all the right English knitting terms, sorry for that, but it's really easy to do, so I hope the picture will show you the way.
This is my finished card. For the diaper you will need the following:
- cotton yarn
- knitting needles number 2
- a small locking pin
You start with 3 stitches. Knit 1 row.
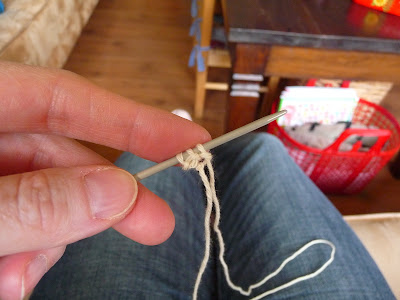
From the 2nd row (or the 3rd, if you count the starting row) you will add an extra stitch after the first and before the last stitch in every 2nd row. Add the extra stitch by picking up a stitch from the previous row, as you see on the picture above.
Keep on knitting this way until you have finished 13 tours (or 26 rows).
Now you will have to tie off the stitches. I do this as follows; knit the first 2 stitches. 2 stitches on your right needle. Pull the 1st stitch on your right needle over the 2nd one. One stitch left on your right needle. Knit the 3rd stitch (on your left needle). 2 stitches on your right needle. Pull the 2nd stitch over the 3rd. One stitch left on your right needle.
And so on, until you have done all the stitches.
Than you have 1 last stitch on your right needle. Make the loop bigger, cut the thread at 10 cm and pass through the loop. Attach the wires. Attach the points of your diaper together with a locking pin and your embellishment is ready to use!
Good luck, and I would love to hear if you like this tutorial :-)
Further details about the card can be find on my blog. Hope to see you again!


Wow Ing! What a super cute and creative idea if you! Thanks Honey for sharing! So inspiring once more :) Love, Angie
ReplyDeleteWhat a Brilliant idea! Thank you so much for sharing.
ReplyDeleteChrissyxx
fab idea!
ReplyDeleteThank you for sharing!
Will try it in the next days!
Helemaal geweldig Ingrid...dank voor de duidelijke tutorial!
ReplyDeletexxx Margreet
Super leuk gedaan Ingrid! De beschrijving in het Engels is wel wat lastig voor mij. Mijn moeder is altijd erg handig, wie weet kan zij het aan de hand van de foto's wel zo namaken. Bedankt in ieder geval voor het delen. Liefs Marianne
ReplyDeleteBeautiful crafted. That is sweet. Thanks for sharing!
ReplyDeleteSo cute, great tutorial Ingrid and your card is perfecto!
ReplyDeleteGreat idea!!! Beautiful card!
ReplyDeleteA kiss
Dany
eine super idee. die karte ist einfach suess. danke fuers tutorial.
ReplyDeletegruss aus colorado
dagmar
j'adore vos idée,Bravo!
ReplyDeletej'adore vos idées,bravo!
ReplyDeleteHello,
ReplyDeletethats a cool idea. I will to this too.
Thanks.
Hugs
Ines
Very nice tutorial thank you ingrid!
ReplyDeleteGreetings Maia
nice blog!
ReplyDeletecongratulations!!
Wow this is a beautiful card....
ReplyDeleteIt´s so nice!
Why you have not german on your translator? I can´t found this.
Have a nice Day
Heike