


 To complete the Project, you will need:
3 12x12 inch sheets of plain cardstock ( I used Kraft on my Project)
Ribbon
Ribbon sliders
Patterned papers and embellishments to decorate your Project
2 pieces of chipboard cut to 13.2cmx13.2cm
Double sided tape and glue
A bone folder
A button and twine
Velcro fastening
Stick on gems
A circle die or punch
Henry Which Direction stamp
Henry Around the World stamp
Henry Looking for Adventures stamp
Adventure Awaits sentiment stamps
To make the Exploding Scrapbook:
 Cut three pieces of cardstock to measure 10 inches by 10 inches. Fold 1 in half and crease with bone folder.
 Open up and turn and fold opposite edges together so the paper is divided into four squares by the folds.

Open up and fold corner to corner so you end up with a fold through the diagonal.
 Turn the sheet over and fold in on the diagonal score lines so you end up with a collapsed square. Repeat with two other 10x10inch sheets.
 Open up and with the diagonal mountain folds upwards, add tape to the right hand square.
 Open up another folded sheet, turn the oppposite way up and stick two sheets together so the squares are stuck on top of each other.
 Stick third piece on so it is facing the same way up as the first piece to make a concertina book.

Now all pages of the book have been added. Fold up the book.
 Cut two pieces of Chipboard to measure 13.2x13.2cn, cover with patterned papers, mitring the corners.

Decorate the front cover by adding ribbon attached with double sided tape and corners made by cutting a die cut or punched circle into quarters. Thread pieces of ribbon 6cm long through ribbon sliders and stick ends together with double sided tape.

Cut a piece of card to 0.9cm x15cm. Thread through ribbon sliders folding 2cm each end and glueing with strong glue. Attach to reverse of book cover as shown. Add double sided tape to cover.
 Cut a strip of Kraft card 1.5cm x15cm, notch edges and add to top of back cover. Add velcro dot to the end of the strip to use as a closure for the book.
 Sandwich the folded book pages in between the finished covers . You are now ready to decorate the book.

I added some tickets from my stash to the front cover and some stick on gems , a charm tied around the handle and an image of Henry Around the World which I coloured with Promarkers. I also added a button to finish off the fastening.
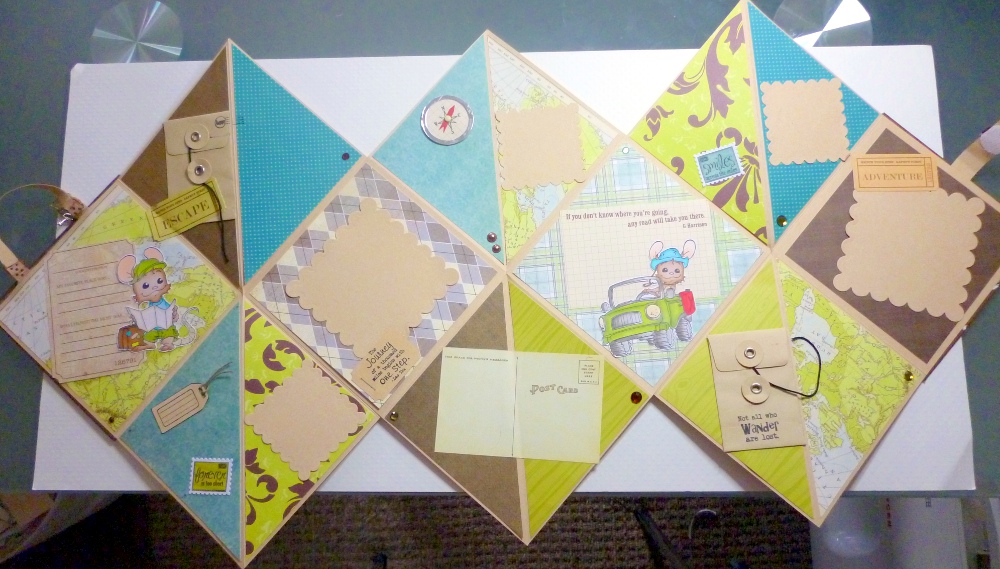 Here is the inside of my album ready for some photos and journalling. I also added little pockets for memorabilia.
 Here is a close up of the inside. I made the compass using a stamp from the Adventure Awaits sentiment stamps by stamping the compass image on patterned paper. I cut a little arrow and then cut a circle from acetate and a frame from silver card using my nesties and layered everything up attaching the compass needle with a tiny brad.
 This is another close up of the inside. I used coordinating papers from my scraps box to match the K+Co map paper and took my inspiration from these colours to colour in my images with Promarkers.
I hope you have enjoyed my tutorial and will be inspired to give this a try. Enjoy the rest of your weekend!
Jane
x


Oh Jane this is FAB !! Is it OK to copy your design as I want to make one ??
ReplyDeletehugs Diane xx
wow what a super workshop ! It goes on my todo list ! Thanks for this workshop. Hugs, Marion
ReplyDeleteThanks Jane, bloggers are so kind in sharing !! Glad you like my bit of recyling !!
ReplyDeletehugs Diane xx
hiya sweetie
ReplyDeletethank you for the tutorial hunni
your project is amazing sweetie
hugs angelique
Awesome project.....I want to copy this also....gotta make one...thank you so much for sharing...
ReplyDeleteHallo, gibt es auch deutsche tutorials bei Whiff of joy?
ReplyDeleteLiebe Grüße Mona
I love you creation, Jane!!!
ReplyDeleteIt's fantastic!!!
Big hugs, Murielle
Awesome! I love it!
ReplyDelete