


Hallo Zusammen,
ich bins, Dunja. Ich hoffe, Ihr hattet eine tolle Woche.
Heute darf ich zum zweiten Mal ein Tutorial als Gastdesigner zeigen. Ich hoffe es gefällt Euch.
Hi Everybody,
it's me, Dunja. I hope you had a great week.
Today I can show you a second tutorial as a guest designer. I hope you like it.
it's me, Dunja. I hope you had a great week.
Today I can show you a second tutorial as a guest designer. I hope you like it.
Das braucht Ihr / here is, what you need
Scorpal
1 x Cardstock 15 x 27 cm 6" x 11"
1 x Cardstock 15 x 19 cm 6" x 7"
3 x Designpapier 4,5 x 14,5 cm 2" x 6"
4 x Designpapier 14,5 x 3,5 cm 6" x 1"
1 x Designpapier 12 x 7 cm 5" x 3"
Whiff of Joy Papierkit "Frühlingserwachen"
Whiff of Joy "Freunde fürs Leben - Nora und Ben"
Whiff of Joy "Ein kleiner Gruß"
Whiff of Joy Schmetterlinge Rand Stanzteil
Whiff of Joy Lieblicher Anhänger mit Herzchen
Spellbinders "ovals" and "scal. ovals"
Lochzange / Punch
Satinband / Satin ribbon
Spitze (beige) / Lace (beige)
Blümchen / Flowers
Knopf / Button
Kleber / Glue
Straßsteinchen zum Verzieren / Rhinestones for decoration
Stanzer zum Ecken abrunden / corner punch
doppelseitige Klebeband / double-sided adhesive tape
Als erstes habe ich die beiden Cardstock-Zuschnitte gefalzt.
15 x 27 cm --> bei 4cm, 19 cm, 23 cm
6" x 11" --> 2", 7", 9"
15 x 19 cm --> bei 4 cm
6" x 7" --> 2"
First I folded the two cardstock blanks.
15 x 27 cm -> at 4 cm, 19 cm, 23 cm
15 x 27 cm -> at 4 cm, 19 cm, 23 cm
6" x 11" --> 2", 7", 9"
15 x 19 cm -> at 4 cm
6" x 7" --> 2"

Anschließend werden beide Teile miteinander verklebt.
Put both parts (bonded) together.
Put both parts (bonded) together.

Dann sieht es so aus:
Than it look like this one:

Nun werden alle Papierzuschnitte an allen Seiten gewischt. Ich habe dazu Distress Ink "Vintage Photo" verwendet.
Now the paper cuts are wiped from all sides. I have used Distress Ink Vintage Photo.

Ich habe den Text"ein lieber Gruß von Herzen" abgestempelt und ihn mit dem zweitkleinsten Stanzteil ausgestanzt. Um einen Rand zu bekommen, habe ich das passende Gegenstück der gewellten Ovale benutzt und dann zusammengeklebt.
I stamped the text "a warm greeting from the heart" and cut it out with the second smallest oval of Spellbinders. To get an edge, I used the matching counterpart of the scalloped ovals and then glued together.

Jetzt werden die Seiten mit den Papierzuschnitten beklebt. Dies ist der äußere Teil.
Now the sides are covered with paper blanks. This is the outer part.

Nun werden die beiden Löcher gestanzt, an dem der Tragegriff aus Satinband befestigt wird. Dazu habe ich genau auf dem Falz gelocht.
The two holes are punched on which the handle is attached with satin ribbon. In addition I have drilled exactly on the fold.

Jetzt wird das Band durch die Löcher gezogen und auf der Innenseite festgeklebt. Danach habe ich den Magnet am Deckel angeklebt. (Man sieht ihn später nicht mehr, da noch das Designpapier darüber geklebt wird.)
Now the tape is pulled through the holes and glued on the inside. Then I glued the magnet to the cover. (You see him later no more, there's the pattern paper is glued on it.)

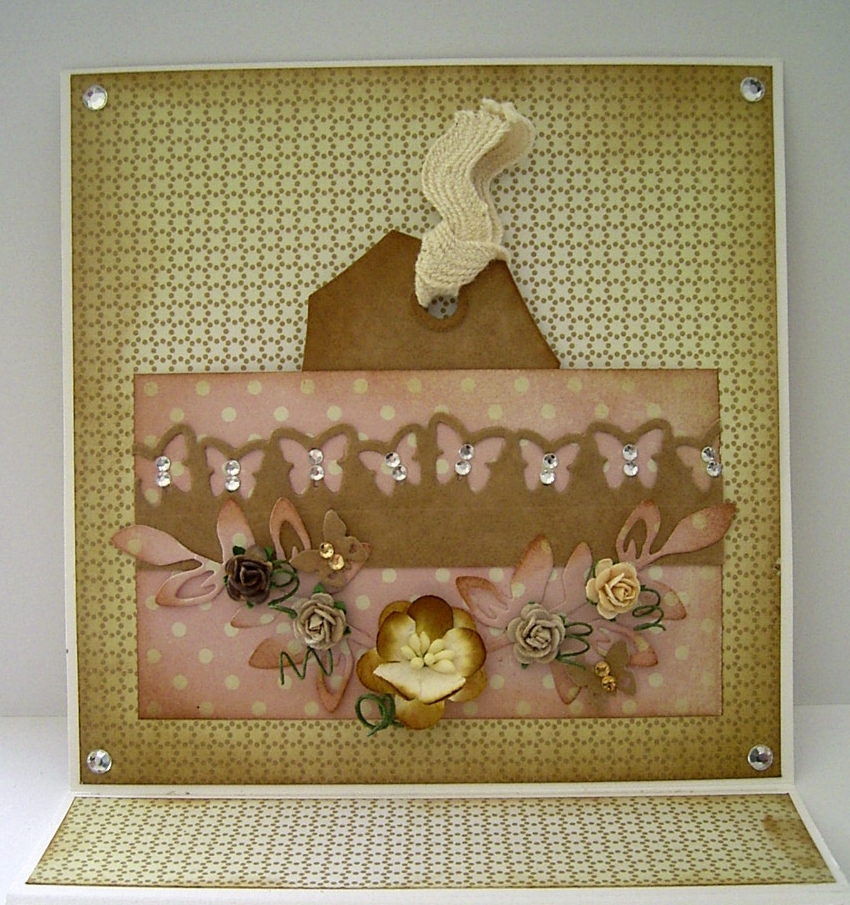
Die Innenseiten werden ebenfalls mit den Papierzuschnitten beklebt. Danach habe ich das Motiv aufgeklebt und dekoriert, wie z.B. mit Blumen, Straßsteinchen usw.
The inside pages are also covered with paper blanks. Then I glued the motif and decorated, such as with flowers, paste stones, etc.

So sieht die Verpackung dann zum Schluss aus.
Now the gift bag is finished.


Das Motiv habe ich mit Distress Ink's coloriert.
I've coloured the image with the distress ink's.

Die Tasche für das Tag:
Ihr klebt es einfach nur an den beiden kurzen Seiten und unten an, dann kann man das Tag oben einstecken.
The bag for the tag:
You simply stick it on only at the two short sides and bottom, then you can insert the tag above.
Wenn Ihr Euch das Bild genau anseht, dann könnt Ihr erkennen, das ich die Seile der Schaukel mit dem Knopfgarn nachempfunden habe. :)
Have a look at the picture, then you'll realize that I have modeled the ropes of the swing with the thread. :)

Vielen Dank, das Ihr mein Tutorial angesehen habt. Ich hoffe,es hat Euch gefallen und Ihr probiert es mal aus. :)
Ein schönes Wochenende
Thanks for looking. I hope you enjoy it.
Have a wonderful weekend!
Hugs Dunja x x x


Gud!!! Zer GUD!!
ReplyDeleteFantastic lesson Dunja! Thank you so much!...Nancy :o)
ReplyDeleteIt's gorgeous! I love everything about it, fabulous coloring!!
ReplyDeletexxx
Mariska
Wow Dunja...das ist toll und super erklärt! Gefällt mir total gut! Danke für die Anleitung!
ReplyDeleteLg
Martina
How pretty! Great instructions and photos. Hugs, antonella :-)
ReplyDeleteWhat a lovely "bag" ♥.
ReplyDeleteCould it be possible to have all of patterns sizes also in inches? I have the Scorpal with inch sizing.
...einfach wunderschön und ein klasse Workshop....hab´ vielen Dank dafür....;)
ReplyDeleteLG
ILONA aka schnuti
http://schnutiskreativeseite.bolgspot.com/
superbe ce tuto , je vais m'empresser de le faire
ReplyDeletemerci beucoup
biz claudine
Très très jolie réalisation et merci pour ce tutorial génial. Bisou
ReplyDeleteThanks for all your lovely comments!
ReplyDelete@ Pirkko-Liisa:
I had a look and complement the information in inches. In addition I have used a conversion calculator. You can find it here
Dunja
This is absolutely adorably Dunja! It looks quite complicated material wise, but no matter to me because it is an incredible visual delight. I so appreciate all the work you went to in creating the post and the beauty of the card, the coloring and the sophistication of the colors and treatments. Thank you! Have a wonderful day.
ReplyDeleteBeautifull bag and thanks for sharing the tutorial Luv Sue x
ReplyDeleteThank you so much, Dunja ♥
ReplyDeleteWow, wie klasse! Das muss ich auch mal ausprobieren!
ReplyDeleteLiebe Dunja, vielen Dank für den tollen WS. Deine Karte ist so toll, dass ich mich auch gleich an den Basteltisch gesetzt habe.
ReplyDeleteLiebe Grüße
Petra
http://stempeltuermchen.blogspot.com/
Thank you for sharing such a pretty tutorial. I'll try to do it for my freind birthday/
ReplyDelete