This time I would like to show you how I craft my cards.....
When it comes down to crafting my cards I can be pretty chaotic.
I seldom think what I want my cards to look like once they are finished
It all depends on my mood of the day:-)
Heute möchte ich euch mal zeigen wie ich meine Karten bastel....
Ich bin, was das Karten basten angeht sehr chaotisch, denn ich mache mir nie irgendwelche Gedanken wie die Karte später aussehen soll. Sie entsteht nach meiner derzeitigen Laune.
First I select my motive and colour it - I love the Twinklings H2O - available in Katharina's shop Whiff of Joy.
Als erstes suche ich mir ein Motiv aus und coloriere es , zur Zeit liebe ich die
Twinklings H2O, die ihr in vielen tollen Farben bei Katharina im Shop bekommen könnt.
Once I have coloured my image I select the paper -
picking the right paper is easy as I have plenty of my favourite paper at home - just as well as I always take colours that pop into my mind right there and then
It never occurs to me to colour according to the matching paper.
Ist mein Stempelbild fertig, mache ich mich daran die passenden Papiere dafür zu suchen, da ich meine Lieblingspapiere habe ist dies meist gar nicht schwer, denn dort findet sich immer etwas... Zum Glück, denn ich nehme beim colorieren die Farben die mir gerade so in den Sinn kommen.
Ich coloriere nie nach irgendwelchen passenden Papieren.
Here a selection of papers that I have chosen for my coloured image
If I add anything it's usually a last minute decision Hier mal eine kleine Auswahl, die ich passend zu meinem colorierten Stempelbild heraus gesucht habe.
Ob noch etwas hinzu kommt entscheidet sich meist erst bei der Fertigstellung meiner Karte
I really enjoy working with sketches for that reason I often design some myself
like this one...
It's real fast to assemble a card if you follow a sketch
Gerne arbeite ich mit Sketchen, entwerfe deshalb auch öfters selber welche.
So wie diesen hier...
Durch den Sketch lässt sich die Karte super schnell zusammen stellen....
As I needed a round motive for my sketch I used my Cuttlebug...
Da ich ein rundes Motiv für meinen Sketch brauche, wird das Motiv erstmal durch meine Cuttlebug gedreht...
The matting circle for my motive is cut from my blank card which I use as base for the design paper
Die Matte für das Motiv schneide ich mir aus meinem Kartenrohling, den ich als Matte für das Design Papier verwende.
 Now you can start decorating
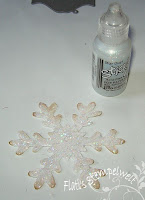
As I have chosen a winter motive for my card I decided to use snowflakes adding some glitter
I did not decided upon a definitive text so I simply punched a part from a bigger text composition
that I previously stamped on a piece of water colour paper.
dann geht es an die Deko der Karte.
Da es ein Wintermotiv ist welches ich für meine Karte ausgesucht habe, habe ich mich für Schneeflocken entschieden die ich mit Stickles beglittert habe
Da ich mich für keinen bestimmten Text entscheiden konnte habe ich mit dem City Girl Stanzteil einfach wahllos etwas aus einem großen Schriftstück ausgestanzt, welchen ich vorher auf ein Stück Aquarellpapier gestempelt habe.
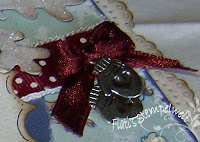
Add a small button as an eye catcher and the description field is accomplished
Noch schnell ein kleiner Knopf als Hingucker drauf und fertig ist auch das Textfeld von meinem Sketch
My card would be finished if not for the blank card
I cut it according to my own desire. All I require is a big sheet of water colour paper (200 m² )
I cut it slightly bigger than the actual card starting from the width, followed by punching the edge with a pretty edge puncher.
Eigentlich wäre meine Karte nun fertig, es fehlt nur noch der Kartenrohling.
Diesen schneide ich mir jedes mal selber zurecht. Dafür benötige ich einen großen Bogen Aquarellpapier (meines ist 200g m² schwer) Von der Breite her schneide ich ihn etwas größer als die eigentliche Karte, dann stanze ich mit einem schönen Randstanzer die Bordüre
I then glue on my card and make a fold with the Scor Pal close to the card.
Fold the card and cut off the overlapping part. Klebe anschließend meine Karte dort auf und falze mit dem Scor Pal knapp hinter der Karte, klappe sie zusammen und schneide den kleinen überstehenden Rest ab.
My card is finished - but then I had an idea
I felt that something was missing
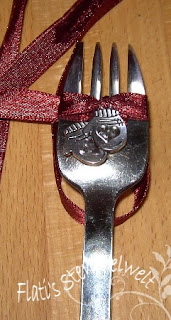
and added a charm attached to a ribbon
"forkbows" are real easy to do
A Tutorial is coming soon
Nun wäre meine Karte eigentlich fertig...., aber dann kam ich noch auf die Idee das etwas fehlt und da habe ich kurzer Hand noch schnell eine kleine Schleife mit einem Charm dazu gemacht
Super schnell gehen die *Gabelschleifen*
Ein Workshop wird folgen
 Now my card is truley finished .... and I have left a huge mess on my crafting table......
Nun ist sie aber fertig... und auf meinem Basteltisch herrscht ein heilloses durcheinander....
Hugs
Sonja xx
Habt ein Auge auf unseren Tutorial - Blog , denn ein Workshop für die Gabelschleife wird folgen
Have a look at our Tutorial-Blog, I will show you later a fork-bow Tutorial