


First, gather your supplies:
- Penguins Winter Fun stamp
- Seasons Greetings Sentiment set
- Fancy Shape die
- Snowflake Trio die
- Acetate strip 3.5 inches x 1 inch (9cm x 2.5cm)
- Decorative Brad
- Small flat brad
- Paper piercing tool (I used my silent setter but a cropadile would work as well)
- 6x6 card base,
- Designer paper 4 ½ x 4 ½ inches
- Cardstock 4 5/8 x 4 5/8 inches
- Embellishments
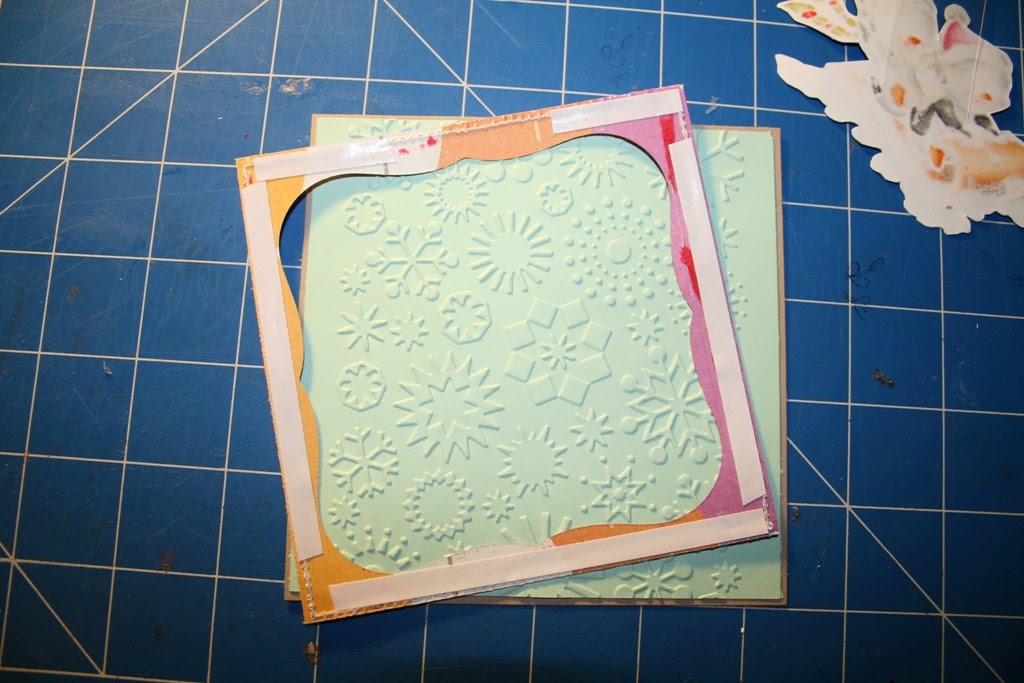
Using your square piece of designer paper, carefully cut a shape out of the centre. I used a die to cut a shape but you could trace a circle and carefully cut that out if you wish. If using a die, centre the die on the paper and use some tape on the inside to hold it in place while you run it through your die cutting machine so it doesn't move.

Apply double sided tape to the back of you designer paper, leaving a space at the top for the pendulum to move.
Apply some adhesive tape to one end of the acetate strip

Attach the acetate strip to the back of the image. Position the designer paper over the backing cardstock - don't adhere together yet.

Turn your image to the correct side and line it up in the centre of the hole you cut earlier.

Place a small dot on the acetate where you will create a hole to insert the brad that will create a pendulum. Carefully remove the designer paper without moving your image or acetate as you need to ensure your dot remains over the cardstock where you will need to pierce a hole through both thicknesses.

Pierce your hole through the acetate and the cardstock. You want the hole to be neat so I used my silent setter to cut the hole to ensure a clean hole and a smooth swing of the pendulum.

Fasten the acetate to the cardstock backing with your small flat brad. Your Penguins now swing!

Remove tape backing and position the designer paper over the cardstock.

Cut your Snowflakes using the Snowflake Trio die and pierce a hole in the centre of the large snowflake.
 Pierce a hole in the top of your acetate strip and fasten two snowflakes together with the acetate with a decorative brad (the new Whiff of Joy brads are perfect for this)
 Decorate your card base and then attach your completed pendulum square
 And here is the finished card

Just move the snowflakes and your Penguins sled down the slope!


Pierce your hole through the acetate and the cardstock. You want the hole to be neat so I used my silent setter to cut the hole to ensure a clean hole and a smooth swing of the pendulum.

Fasten the acetate to the cardstock backing with your small flat brad. Your Penguins now swing!

Remove tape backing and position the designer paper over the cardstock.

Cut your Snowflakes using the Snowflake Trio die and pierce a hole in the centre of the large snowflake.
 Pierce a hole in the top of your acetate strip and fasten two snowflakes together with the acetate with a decorative brad (the new Whiff of Joy brads are perfect for this)
 Decorate your card base and then attach your completed pendulum square
 And here is the finished card
Just move the snowflakes and your Penguins sled down the slope!

I hope you find this tutorial useful! If you make a card using this tutorial, please leave a link below so we can have a look!
Enjoy your weekend,


This is AWESOME Kylie!! Love the little images and the layer of the finished card is just gorgeous!
ReplyDeleteHugs, Kylie aka Brown xo
what a amazing idea hun
ReplyDeletei just love it
your card is stunning hun
hugs angelique
Cute way to let the penguins sled!!
ReplyDeleteLove the papers and snowflake
TFS
Sonja x
Beautifull, thank you for the tutorial! Kiss. Nadine
ReplyDeletewhat a great card ! thanks for your tutorial ! worth to try it !
ReplyDeletegreetings, martina
x
Really beautiful and nice pendulum card :). Hugs, Jeanette :)
ReplyDeleteoooh Awesome card
ReplyDeletelove the idee and it looks stunning
hugs andrea
Great tutoral. Thanks for sharing!
ReplyDeleteThis is so great and pretty. Thanks for sharing the tutorial.Zulma.
ReplyDeleteAwesome card! Will def try this one time (to do list is getting longer and longer ....)
ReplyDeleteHugs Yolanda
Woow ich bin begeistert.
ReplyDeleteLG Manu
fabulous kylie.such a stunning card xx
ReplyDeletelove debbie xxx
te quedó muy bella y gracias por la idea, me encantaría tener una matriz de copo de nieve, pues los nestabillities de alguna forma se pueden reemplazar pero el compo, es imposible.... te quedó muy, muy linda, cariños.
ReplyDeletewow, wot a fab idea - very original......love it!!!! Have to give this one a go myself...
ReplyDeleteooo my grands will love this..great idea for theier c'mas card!! tfs..love it..loves ya
ReplyDeleteadorable idea!
ReplyDeletethanks for showing us your great idea.
ReplyDeletelovely Greetings
Dunja