


You will need:
Pin )
Silver bead ) all from Whiff of Joy
Butterfly pendant charm )
A small scrap of paper to match your card
liquid pearls
glossy accents
scissors
pencil (not too sharp a point on it - it needs to be a rounded end!)
silicone glue
1.
 Here are the three items from Whiff of Joy that I am going to make into embellishments for a card.
2.
 Firstly, to make a beautiful pin, squeeze a small amount of silicone glue onto the pin as shown. Not too near the head of the pin or it won't keep the bead in place!
 Simply slide the bead down to the end of the pin over the silicone glue. Some glue will ooze out around the head of the pin. Remove this with some scrap card to ensure a neat finish.
3.
 Allow to dry making sure to keep it head down whilst the glue sets. I press the head of the pin into some blu tak until it is dry or you could stick into some polystyrene too.
 Allow to dry making sure to keep it head down whilst the glue sets. I press the head of the pin into some blu tak until it is dry or you could stick into some polystyrene too.
4.
 Now for the trickier part - the butterfly pendant charm! Take a small scrap of paper making sure it is larger than the oval pendant on the bottom of the charm.
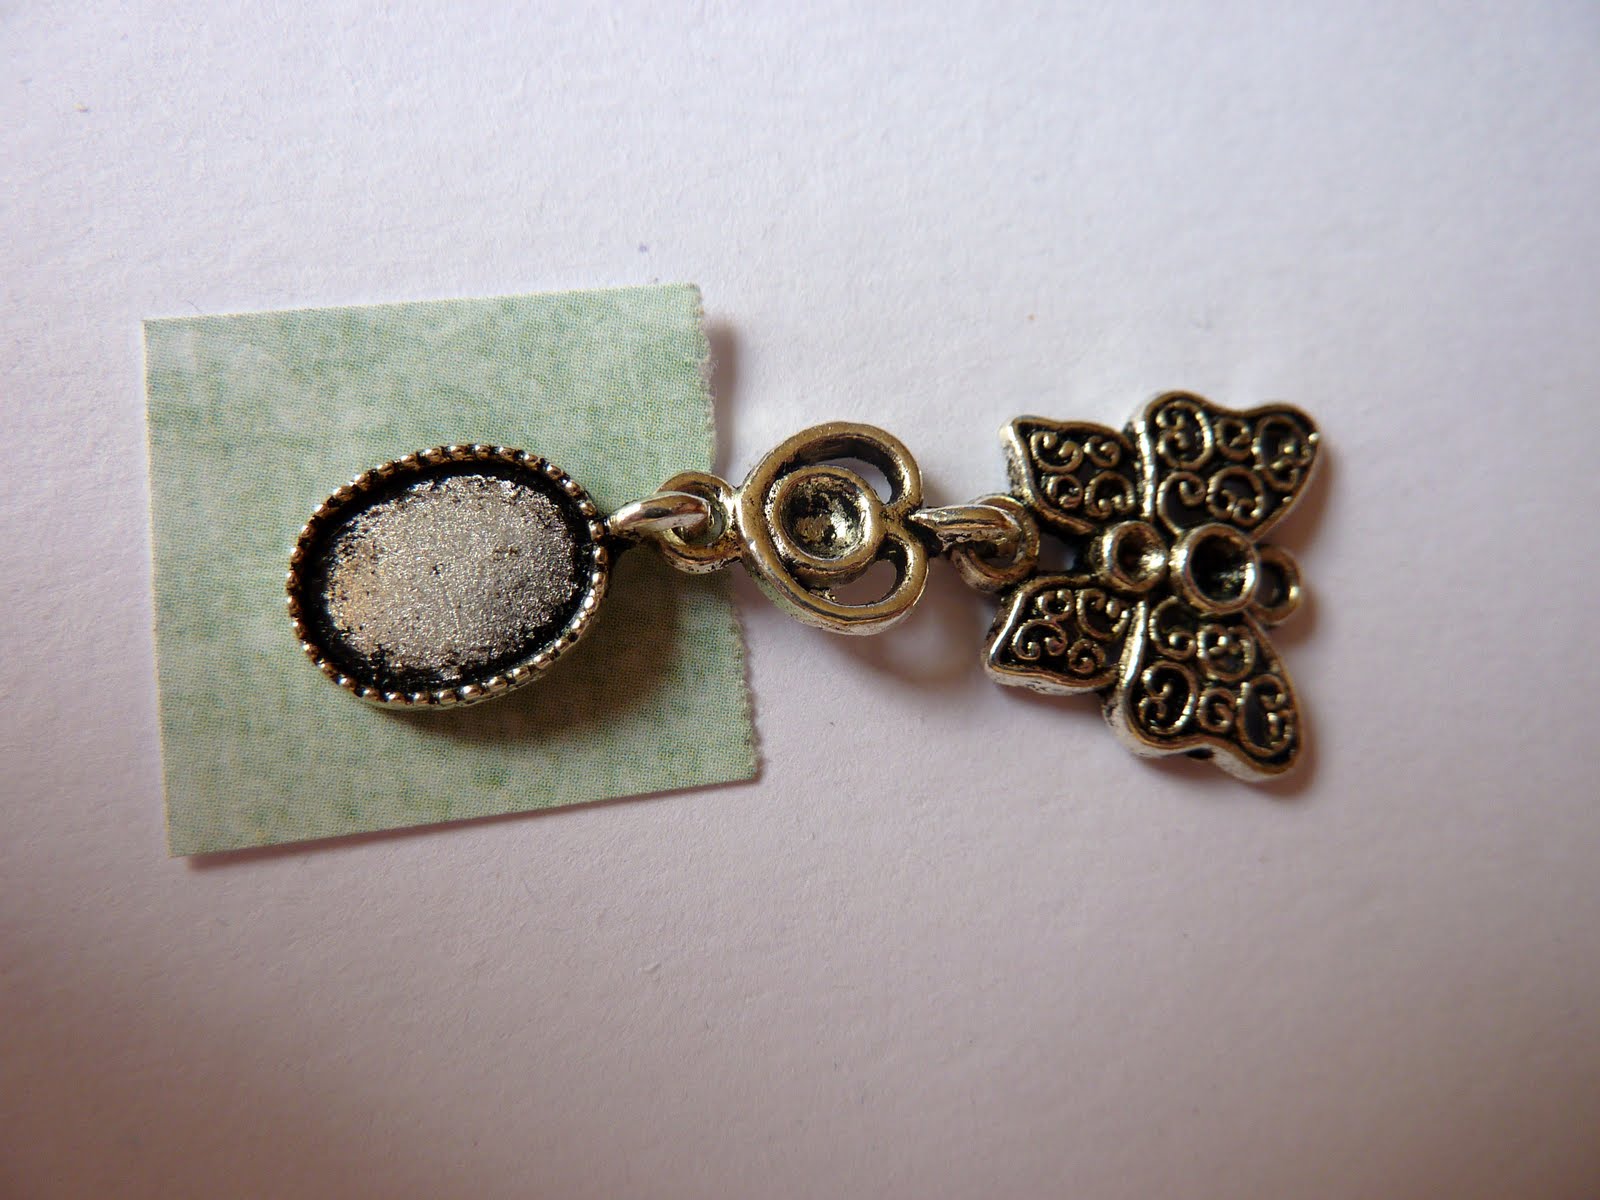 Now for the trickier part - the butterfly pendant charm! Take a small scrap of paper making sure it is larger than the oval pendant on the bottom of the charm.
5.
 Place the paper patterned side down over the oval and using your blunt pencil press and draw round the inside of the oval as close to the edges as you can. (a sharp pencil will tear the paper)
 When you have finished it will look like this.
 Place the paper patterned side down over the oval and using your blunt pencil press and draw round the inside of the oval as close to the edges as you can. (a sharp pencil will tear the paper)
 When you have finished it will look like this.
6.
 Turn the piece of paper over and you can see that you now have the perfect shape of the oval inset embossed into the paper!
 Turn the piece of paper over and you can see that you now have the perfect shape of the oval inset embossed into the paper!
7.
 Cut carefully around the embossed area.
8.

Glue the paper oval into position using a small amount of glossy accents.
9.
 Now cover the entire paper area with glossy accents and allow to dry. Then repeat with another coat of glossy accents for a raised finish that looks like a gemstone is in the oval!
10.
 Now for the small circle areas. Fill each one carefully with liquid pearls creating a raised pearl in the centre of each one.
 Now for the small circle areas. Fill each one carefully with liquid pearls creating a raised pearl in the centre of each one.
11.
 Once the liquid pearls are dry cover them with some glossy accents too so that they shine nicely and allow to dry.
 Once the liquid pearls are dry cover them with some glossy accents too so that they shine nicely and allow to dry.
12.
 Here are the finished embellishments........
 ......and here they are on my card! As you can see, the oval was filled with a piece of the top backing paper so that it matches the card perfectly! I have also used one of Whiff of Joy's new dies on my card. The beautiful grass effect behind the butterfly edge has been created with Whiff of Joy's new grass die. It is on sale now along with two more useful and beautiful dies here!
Hope you enjoyed the tutorial, thanks for looking! x
Jane x
NB. The charms and bead used in this tutorial were a free gift with purchases for a limited time and unfortunately are no longer available.


thanks jane for this tutorial
ReplyDeleteit meas a lot
love your card, it's gorgeous
hugs angelique
They look gorgeous! Susie x
ReplyDeleteSo very very nice!!!
ReplyDeleteLove and hugs ~
Lori
wau..very pretty...Thanks for the idea..
ReplyDeleteGorgeous card! And thanks for the tutorial - I was wondering how to use those larger beads! :-D
ReplyDeleteWOW Jane!!! I love it..... it's a wonderful way to use them!!
ReplyDeleteThanks sweetie for sharing with us.
Hugs
Giò
This is brilliant Jane - another absolutely stunning detail to be used which - I'm beginning to understand what it is that draws the eye in your cards. Your attention to detail just delights me.
ReplyDeletePaula (PEP)
http://pepcraftchallexp.blogspot.com/
Brilliant ideas, Jane - thanks for the tutorial!
ReplyDeleteDiane x
Wow.....this idea is so awesome.
ReplyDeletethanks for this tutorial.
hugs Anna