


Happy Valentine's Day!
very 1st post on the Whiff Of Joy Blog as a Stamp Kit Contributor.
I am so excited to share my Valentine's Card with Henry
from the First Secret Stamp Kit 2014.
I also prepared a coloring tutorial with Distress Ink re-inkers
and Distress Markers with some coloring tips.


Click on the images to enlarge it.
Coloring Tutorial
I stamped the image with Archival Ink Jet Black on watercolor paper.

1. Here are my supplies I used to color my stamped image:
Distress Ink re-inkers (instead of re-inkers you can use ink pads -
re-inkers are used to re ink the Distress pads),
Distress Ink Markers, clear water, a brush
with a very fine tip and a paper towel.

2. I started with the Tea Dye color. You wet the brush and wipe
the excess water on the paper towel. The brush has to be wet
but not soaked with water. Dip the point of the brush into the color
and draw a fine line on the parameter around the face as shown
above on the pictures. Then dip the brush into the water and wipe
the excess off on the towel. Remember, you want the brush to be damp.
Now with circural motion you spread the color with the brush
towards the middle of the face.

3. You repeat the process on Henry's body. The more you clean
your brush with water, the lighter color you will get.

4. For the Saxofon I also used Tea Dye as a starting color.
Compare to the face the color appears a bit darker. To achieve
that you don't clean your brush in the water completely.
Remember to wipe your brush on the paper towel. You will
also see the intensity of the color on the paper towel.
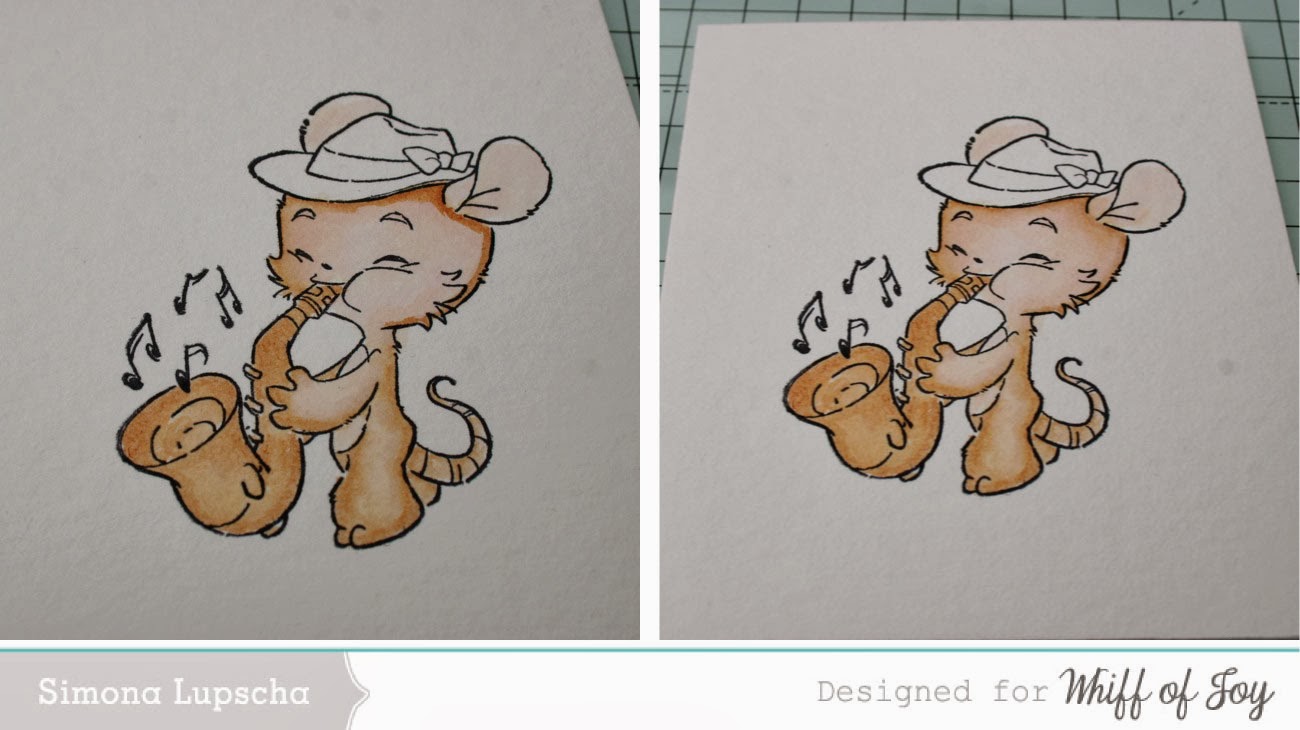
5. Once the first layer of the color on the face was dry I
used Tattered Rose to repeat the process.

6. I used Victorian Velvet for the ears.

7. Once the first layer of color was dry
I used Rusty Hinge as a second color on the Saxofon.

8. For the cheeks I used a mix of two colors:
Tattered Rose and Aged Mahogany.

9. And finally last but not least I colored the hat with
Forrest Moss and Festive Berries.
At the end I used Forrest Moss Distress Marker to enhance
the color on the hat and to get the stronger shadow. If you don't have
Distress Markers you can do that with layering the same color.
The only thing you have to remember is to dry colored layers
before you add more color and leave more color on your brush tip.
I hope you enjoyed reading today's post and
will find this tutorial useful!
Just a reminder... Today is the last day to pre-order the
(click on the link and it will take you straight to the shop)
After that you won't be able to order the
Stamp Kit anymore, so don't miss out.
See you all next time....
Hugs,
Simona
Supply list:


Super super cute card. I just love everything about it. Beautiful coloring and gorgeous colors so everything just screams LOVE all over it.
ReplyDelete