Hallo Ihr Lieben,
Hello peeps,
 hier ist Clarissa von Schnipselundmehr, heute möchte ich euch eine kleine Anleitung zeigen, wie man sich ein Band selbstgestalten kann.
it´s me Clarissa from Schnipselundmehr, today I want to show you, how to make your own ribbons.
material:
Baumwollreste - fabric (white)
Stoffschere - scissors
Textstempel - text stamps
StazOn oder/or Archival Inks
Holzspule / wooden spool (optional)
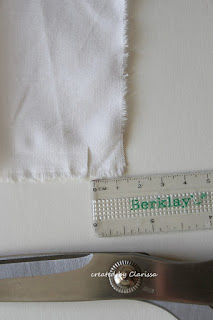
Ihr legt euren Stoffrest der Länge nach auf den Tisch und schneidet ihn ein Stück (ca. 2 cm) ein, in der Breite, wie das Band später sein soll.
Place the fabric on your table and make a little cut ~ 2cm. The position from your cut would be the width of your ribbon.
Nun müsst ihr schnell und fest die beiden Teile auseinanderziehen (an eurem Schnitt!) und schon habt ihr ein weißes Baumwoll-Band.
Now pull fast and strong the fabrik apart (on your cut!), ready is your cotton-ribbon.
Jetzt kommen Stempel und Stempelkissen zum Einsatz, ihr könnt natürlich auch ein anderes als das StazOn verwenden, Archival Ink funktioniert genauso.
Nach Lust und Laune bestempelt ihr jetzt den Streifen.
Now take your stamps and ink pad and create in your style.
Wenn ihr fertig seit, dann nur noch kurz mit dem Bügeleisen drüber, fertig!
If you are ready take the electric iron and give them an smooth look.
Zum Verschenken, sieht es natürlich auch ganz toll auf einer Holzspule aus.
Put your ribbon on a wooden spool, to have a little individual gift.
So, das wars schon wieder für heute, wünsche euch allen einen tollen Tag und schicke liebe Grüße
Have a nice day and thanks for looking.
xoxo Clarissa


What a fab idea, TFS, hugs, Marion
ReplyDeleteWhat a great idea, then we can always find ribbons, that´ll fit to any project, we may have.
ReplyDeleteOh how cute. Thank you for sharing. hugs! Mojca
ReplyDeletesuch a cool and easy-to-do idea! Many many thanks!
ReplyDeleteVery well explained.
ReplyDeleteThanks for sharing!
This would come in very handy at times, great idea. Thanks for the tutorial.
ReplyDeleteGrossartig!
ReplyDeleteWhat a wonderful idea for personalized ribbon.
ReplyDeleteMyrna
Great Tutorial
ReplyDeleteLike this idea ;))
Sonja x
Thanks for the tutorial.... I love it!! :D
ReplyDeleteMarit
Das ist eine super Idee. Vielen Dank für das Tutorial. Das werde ich bestimmt mal probieren.
ReplyDeleteLiebe Grüße
Martina