


Hallo liebe Whiff Of Joy Freunde! Hier ist Kathrin und ich möchte Euch heute ein Tutorial für eine Box zeigen, die nicht nur für Valentinstag geeignet ist.
***
Hello dear friends of Whiff of Joy. It's Kathrin here today and I want to share a tutorial for how to make a box that is not only a great gift for valentine's day.
Ihr braucht:
- ein Stück Cardstock 18,5 x 25 cm
- ein Stück Cardstock 15,7 x 21,5 cm
- ein Stück Klarsichtfolie
- Kleber, Schere, Falzbein/-brett, Verzierung,
You'll need:
- one piece of cardstock measuring 18,5 x 25 cm
- one piece of cardstock measuring 15,7 x 21,5 cm
- a piece of acetate
- glue, scissors, bone folder/scoring tool, decoration
Falzt den größeren Carstock rundherum je bei 1 cm, 2,5 cm, 3,5 cm und 5 cm.
Score each edge of the bigger piece of cardstock at 1 cm, 2,5 cm, 3,5 cm and 5 cm.

Dann müsst Ihr den Cardstock wie auf dem Bild zu sehen zuschneiden. Die kleinen Laschen müssen nicht genau so groß sein, sie dienen nur dazu, die Box besser zusammen zu halten.
Then you have to cut down the cardstock as shown on the picture. There's no need to measure the little flaps, the are just helping to keep the box together.
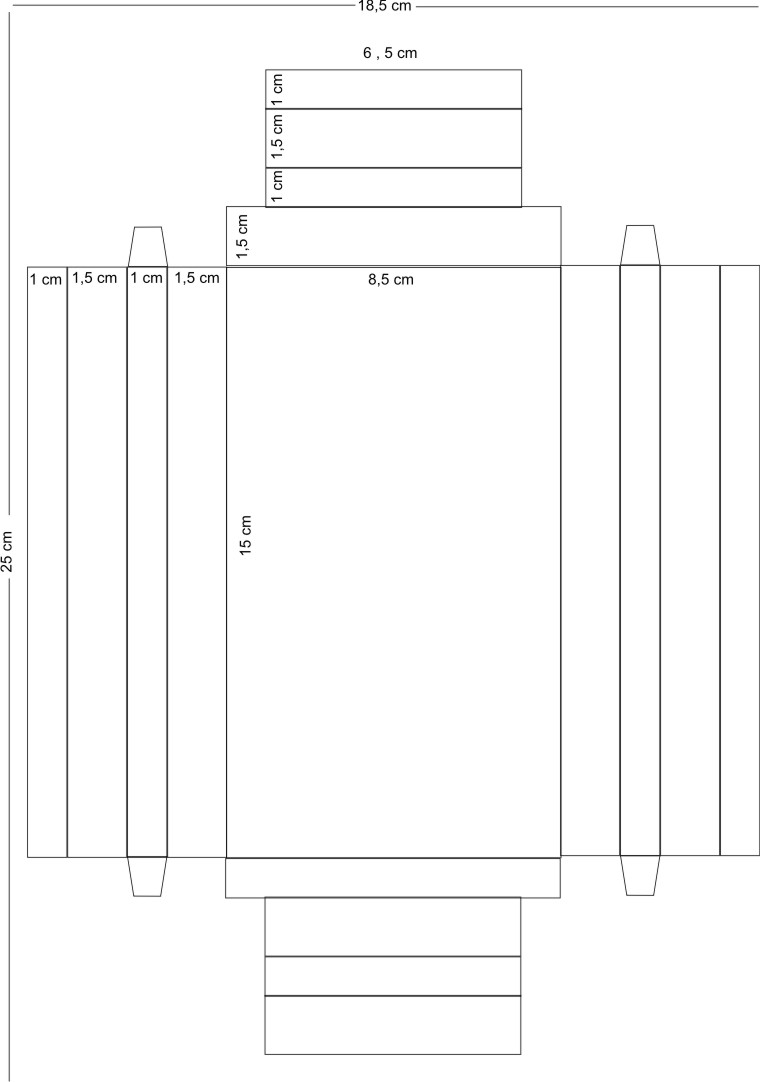

Nehmt dann das zweite Stück Cardstock und falzt es bei 1 cm, 2,6 cm, 11,1 cm und 12,7 cm.
Then take the second piece of cardstock and score it at 1 cm, 2,6 cm, 11,1 cm and 12,7 cm.

Benutzt anschließend eine Stanze Eurer Wahl, um ein Fenster in den Deckel der Box zu stanzen. Achtet darauf, dass zu den Falzungen jeweils mindestens 1 cm Platz ist, sonst sieht man den Rand der Box von oben durch das Fenster durch.
Klebt dann etwas Klarsichtfolie - am besten eine etwas stabilere - von hinten gegen das Fenster. Ob Ihr sie komplett über die Innenseite des Deckels oder nur um das Fenster herum anbringt, ist Euch überlassen.
Then use one of your dies to cut a window in the lid of the box. Take care to leave at least 1 cm to the folds uncut or you will see the edges of your box through the window.
Glue a piece of acetate on the inside of the lid. If you do this all over or just around the window is up to you.

Klebt dann die Box zusammen - ich denke, das erklärt sich von selbst. Einfacher geht es, wenn Ihr mit den längeren Seiten beginnt.
Und auch den Deckel klebt Ihr zusammen.
Glue your box together - I don't think I have to explain how to do that. It's easier if you start with the longer edges.
Also glue together the lid.

Nun müßt Ihr den Deckel nur noch verzieren und die Box füllen - und fertig ist ein kleines Geschenk.
Ich habe meine Box mal ohne Motiv gemacht, dafür aber den Text aus dem Set Kalorienreich und dazu den wunderbar großen Löffel aus der Charmsbox Nr. 1 Mahlzeit verwendet. So ohne Motiv fand ich sie für den Empfänger in meinem Fall schöner.
Gefüllt habe ich sie mit Brauseherzen in weiß und verschiedenen Rosatönen.
All you need to do now is to decorate your box and fill it - and you have a pretty little gift for someone special.
I didn't use a image on this one, but used the saying from Whiff Of Joy's stamp set Kalorienreich and combined it with one of the big spoons from the Box of Charms No 1 FoodLovers. For the one I am giving this box to an image wouldn't have fitted.
My box is filled with heartshaped candies in white and different shades of pink.

Ich hoffe, Euch gefällt meine Geschenkidee und wünsche Euch viel Spaß beim Nachbasteln!
I hope you like my little gift and hope you have fun making your own!


This is so beautiful hun, and a wonderful gift to use for soo many things too. Gorgeous work.
ReplyDeletewaaaaaaaaaaaaaw what a fabulous idea, thank you for sharing. hugs! Mojca
ReplyDeleteWonderful Kathrin
ReplyDeleteLove this , its so sweet!!
TFS Sonja
xx
Oh Kathrin,
ReplyDeletedas ist ja eine süße Box.
Vielen lieben Dank für die schöne Inspiration.
Liebe Grüße
Angela
Sieht superlecker aus, tolle Idee, ist schon gespeichert.
ReplyDeleteVLG Clarissa
Eine wunderschöne Geschenkidee, danke für diese tolle Idee
ReplyDeleteLG Sonja xx
What a sweet little treat box!
ReplyDelete