Goodmorning to you all! I'm glad you're back :-)
Today I (Ingrid) want to show you 4 mini cards, made using the dies from Whiff of Joy.
Here you can see all 4. I'll start with the one on the most right side.
The size of this card is 10x10 cm. I have a piece of paper torn from an old book and stamped Henry with large cupcake on it. I used the pennants die and adhered the flags with 3D tape. The sentiment comes along with the Charlotte on pigeon stamp.
I also attached a little charm from the last collection. These charms are shipped in a cute little plastic jar and vary in size very much, which is really great!
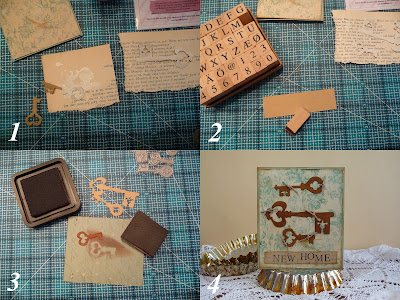
The 2nd card is the "New Home" one with the size of 8x10 cm. First I painted the punched keys (a new die from the latest collection) white, as you can see on the first picture. But I thought they look better when they are darker on the dp that I used, so I punched them out a second time and inked them with vintage photo distress inkt.
The 3rd card is a birthday card on which I used the cloud die. I think it works perfectly with the sentiment which says: "It's raining love and birthday wishes".
This card has a size of 9,5x9,5 cm. I just used the scrap of paper that I had ;-) I also cut the front of the card from a different paper and it is 9,5x9,4 cm, this way it will fit in the card perfectly when you fold it.
On the 2nd photo you can see that the Clouds Border Die has a paper guide. You align your paper against it and this way you cut it straight every time. When I don't want my paper to move while I punching, I use a post-it to hold it in place, as you can see on the 3rd photo.
On photo 5 you can see that I fasten my sentiment with staples. I couldn't reach the spot I wanted to fasten my staple, so I opened my stapler, put a soft mat underneath and pushed the staple through the papers. Then you turn your card around and fold your staple to close.
The last one is my favourite :-) The pennant card! Punch a lot of pennants from at least 5 different dessin papers. Cut the pennants separately as you can see on picture 1. Glue the pennants with a glue stick to your paper (not totally, they must keep a loose effect, they only have to stay in place for the stitching). After sewing the 1st row you can glue the 2nd one. This way you don't stitch over the 2nd row when you want to stitch the 1st one...
The sentiment and the lovely green ribbon you see in picture 5 are both from Whiff of Joy, including the button twine.
Well, I hope I inspired you with these little cards. They won't take much time to create and they are perfect to use up those little scraps.
Hope to see you again soon, here or on my own blog. Thanks for visiting!

Used materials:


wie immer toll!!!
ReplyDeleteWaw beautiful cards. thank you fot the tutorial. hugs! mojca
ReplyDeleteThese are superrrrrrrr, well done and thanks for the inspiration!!
ReplyDeletexx Irene
Love, love, love this tutorial Ingrid. Great to see your fabulous quick ideas. Shows how versatile WoJ is :)
ReplyDeleteThanks a lot for sharing.
Katharina x
I love these four cards! So cute.
ReplyDeleteWow beautiful cards..I think you design it same like plastic cards to make it more better.
ReplyDelete