


 First I add the main hair colour, in this case I am using E17. Apply the colour with feather strokes following the lines of the hair and leave space to add further colours where there would be a natural shine on the hair. (for example at the ends, a halo effect around the top of the head and the middle of curls).
 Next I take a lighter shade, in this case E13 and colour over the top of the first colour but take it further into the white areas.
 Next, take the lightest shade that will be the highlights and colour all of the hair to blend the previous colours. I have used E02.
Next I add E47 to the areas that would be the darkest to create more definition. (for example the area around the hair parting, the start of any curls and any areas that are underneath other locks of hair).

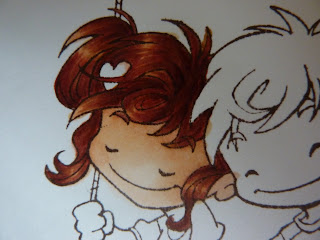
Next, I tone the dark red areas down by going over them with E35 (take care not to go over the highlight areas).
Then I tone the highlighted areas down by going over them with E53 (take care to only use on the highlights or you will take away colour on the darker areas).

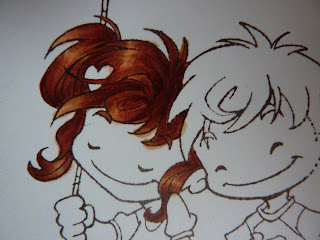
Once I have given all of the hair a "base" colour I go over the areas again to create individual hair strokes. The picture above shows how it looks when I have added individual hair strokes with E17 using light feather strokes following the direction of the hair.
 I do the same again with E35 to complete the look.
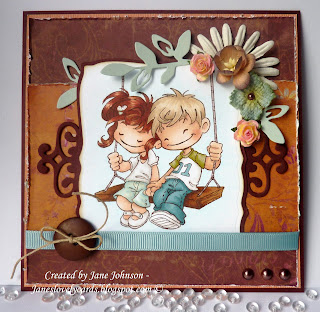 Here is the completed image on a card! I hope you have enjoyed my tutorial and that it is useful to you. For further details about my card please see my own blog.
 I do the same again with E35 to complete the look.
 Here is the completed image on a card! I hope you have enjoyed my tutorial and that it is useful to you. For further details about my card please see my own blog.
Jane x


Merci beaucoup pour le cours de coloration, très belle réussite. Bravo. Bises
ReplyDeleteHey that was great! I love the tutorials that really go into detail and show and describe EVERY stage as you have done, not assuming that the reader can figure out the steps inbetween. It is so fun to watch a creator in person...this is what it felt like watching your tutorial. A gift to presen this way. Thank you! Samara.
ReplyDeleteHello Jane, thank you for the great tutorial you did with Copics.
ReplyDeletegreetings Diny Sprakel
(Copic Instructor)
Perfect! Will try this ones, looks great. Thanks for sharing :-)
ReplyDeleteHugs Ing
Wonderful tutorial.
ReplyDeleteThank you so much. :)
Your cards are all astoundingly beautiful.
You make this look sooo simple! I've not learned of anyone adding the dark color first. I was taught lightest color first then middle then darkest. Your method seems easier!!! Thank for tutorial. I'll definitely will be trying this for myself.
ReplyDeleteI was extremely upbeat and happy to peruse through your website.
ReplyDeleteThe data accessible here is extraordinary.Follow this siteHair strokes permanent make up Fort Lauderdale
This is very essential blog; it helped me a lot whatever you have provided. Hair strokes permanent make up Fort Lauderdale
ReplyDelete