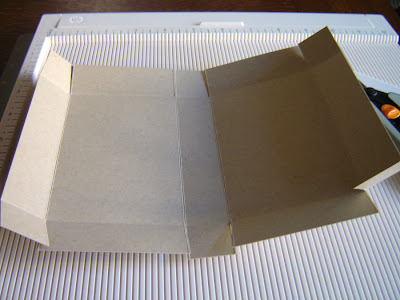
First, you need a piece of cardstock that measures 9" x 6.5". Score at 1", 4", 5" and 8" on the longer side using a scoring tool.
Flip the paper 90 degrees and sore at 1" and 5 1/2" on the short side.
Pre-fold all the scored lines.
Then cut all the 1" scare marks on both long sides like such. They will be the glue tabs for your box, see photo below.
Use your choice of strong adhesive and apply them on the little glue tabs.
Then adhere them to the inside of the longer side tabs.
For the lid.
And here you go. A pizza box! You can decorate it the any way you want from here. Since I altered the measurements to match the Labels 17 die, you can use your dies to decorate it. The box measures 3" x 4.5" x 1" by itself.
Here is my finished box:
I cut two pieces of cardstock using the largest die from the Labels 17 die set, stamped some pattern on them and trimmed about 1/4" off of one side on each piece for the spin of the box.
All I did was decorating it with the Willow with hot chocolate image and used a piece of twill ribbon as the closure. Now it's a perfect gift package for sending some hot chocolate (or tea) packs to a friend!
I am not very good at explaining everything, you can refer to this video tutorial for the assembly of the box. It's exactly the same way of assembling except for the size. =)
Hope you'll give this a try!
Thanks for stopping by!
hugs,
alice


Splendid!!! J'adore! Bises. Nadine
ReplyDeleteFantastic tutorial Alice! Such a gorgeous box. I'll certainly be giving it a go!
ReplyDeleteHugs
Kylie
That is a lovely gift box Alice!
ReplyDeleteI made one similar like that and put chocolate in it.You can see it on my blog
http://harmascardcprner.blogspot.com/
Hugs harma
Bien jolie boite. Merci.
ReplyDeleteThanks dear brilliant tutorial
ReplyDeleteHugs Jacqui xxx
Wonderful tutorial! =)
ReplyDeleteHugs, Elenor
http://www.metrobloggen.se/paltbarn
Super Tutorial ! Wäre aber schön,
ReplyDeletewenn auch in cm angegeben wäre
LG
Helga
Thank you very much....I needed a box for some candy and this is prefect.....again thank you....
ReplyDeleteBeautiful!!
ReplyDeleteWonderful for a gift !!
ReplyDeleteThanks Alice for your lovely tutorial:)
Sonja x
Wonderful tutorial Alice, I'm anxious to try this! Your image is adorable and colored so beautifully, love this!!!
ReplyDeleteEstupendo
ReplyDeleteComo siempre un proyecto precios
Gracias por compartir el tuto
Lovely tutorial! Love that box and the way you completed it, yummie!
ReplyDeleteHugs Yolanda
I had to come over here from your blog to tell you again how much I love this box.
ReplyDeleteHugs and smiles
Fantastic box, Alice! You make it look sooooo easy! I love the image of Willow, too--just perfect!
ReplyDeleteYou did a great job on the tutorial and explained it all well. Thank you for the instructions and I will see which stamps I have that would look good on this type box.
ReplyDeleteKiitos Alice hyvästä opetuksesta:)
ReplyDelete