Showing posts with label Karin. Show all posts

Monday, April 22, 2013

A Shaped Double Tag Card

 Karin Seiness-Lilleseth
Hi you lovely ones :-) Karin her today and
 I`m going to share with you a tutorial how to make a Double Tag Card who`s shaped :-)

First of all a material list:
  •  Stamps: WOJ digi stamp - Diver Henry and  WOJ text stamps - Magical Whises
  • Aquarelle paper, Craft cardstock and double sided patterned paper.
  • Die Lights WOJ - Chevron, Notbook Border, Arrows and Speech Bubbles.
  •  Spellbinders dies and Martha Stewart punch and score board.
  •  Coloring and Ink: Distress Ink Reinkers, Distress Ink and Archival Ink.
  • Gold Embossing Powder, Buttons, ribbon and twine.

To make the card, I start making a circle with a diameter of 10 inches using
a double pattern paper.
Then fold the card as seen below :-)

 Unfold the paper and cut flaps along the last fold edge.

Glue the card as shown on the picture below.
I`ve aged the edges with Distress Ink - Vintage Photo before I glued the card together.

 The card is finished. Just the Tag`s to make :-)
 Here is my card and tags finished decorating :-)

 
I hope I`ve inspired you with this Tutorial and have fun playing :-)
I found the inspiration for this card here!
Creative hugs from

Monday, March 25, 2013

A Flower Stick

 Karin Seiness-Lilleseth

Hi you lovely ones :-) Karin her today and
 I`m going to share with you a quick and easy way to decorate 
a flower bouquet, flowers in a pot etc. with a Flower Stick :-)


Items I`ve used:
Dies from Whiff of Joy and Spellbinders.
Recycled stick from a pot of orcid.
Yellow cardboard and double sided tape.
Distress Ink - Vintage Photo and Peeled Paint


I hope I`ve inspired you with flower-ideas using WOJ either for 
Easter Holidays or some springtime atmosphere!
Have fun playing :-) Creative hugs from

Monday, February 25, 2013

HourGlass Shaped Card


Hi, this is Karin sharing a tutorial
about how to make a HourGlass Shaped Card.


First of all a material list for this 
shaped Card:
 Below you have the template to print and cut out with the measures for: 
the card, green cardstock and pattern paper.
 Of course you also can make it any bigger or smaller. 


Here you see the cards rear and front, and how you fastened the ribbon
so you can tie the card. All sides of the card are decorated.
I`ve also cut out a template for the green cardstock and pattern paper.
All the edges are aged with Distress Ink - Vintage Photo.
With this technique, I think the card look a little softer :-)


So it looks when the ribbon is attached.


The rear and front are finished decorating :-)


The inside of the card with the text:
Good Friends are the real treasure of life!


I hope I`ve inspired you with this Tutorial and have fun playing :-)
Creative hugs from

Friday, January 25, 2013

My Creative Space!

Good Morning All! Karin here 
and I wish you a warm welcome into my Creative Craft Space :-)
  
Once a month this year, one of the DT will create a post showing off their creative space. 
I am first of all and is very excited to show off my "little cave"!!!


 I like to know where I have all my stuff and have therefore ordered all in transparent boxes. 
It is also practical that the things I use the most, are closely to my chair :-)
All my paper are just on my right side so it`s easy peasy to reach!


 I need good light to work in so therefore I have two lamps lit right on the working table. 
On the wall right in front of me, I have maps with an overview of Distress Ink as I use for coloring.


Transparent boxes with stamps, punches, embossing powder, sparkle, heat gun, books with ideas etc.
My newest creations are allowed to be exhibited on the shelves a little time 
 before I put them in my transparent boxes :-)


Under the table I also like to keep it  practical. My copy machine is essential for printing Digi`s!
just as important is that trash is properly positioned so it is quick to throw paper and sticky tape in.


To get in the right scrappin` mood, I always play music from my computer :-)
Mostly it`s from Spotify, but I also listen to different radio channels from the internet.
Every now and then a glass of wine is delicious.
It`s also practical to have the computer as close as I always can use the internet etc.


This is my Before Picture!!!
I have to admit that my Creative Soace is pretty neat and tidy the most of the time. 
1 year ago I had a big cleaning project. Put up shelves, enough table space etc. 
I usually have some clutter with pieces of paper in the middle of the table. 
My children don`t live at home so of course that helps :-)

I hope you`ve got some ideas hove to organize YOUR Creative Space :-)

Creative hugs from

Thursday, December 20, 2012

Decorate the table in Shabby Chic style using WOJ

 Karin Seiness-Lilleseth
Good morning to you :-)
Karin her today - Only a few days left then it's Christmas Eve. My tutorial today is how to decorate the party table easily and quickly in a shabby chic style using WOJ rubber stamp.


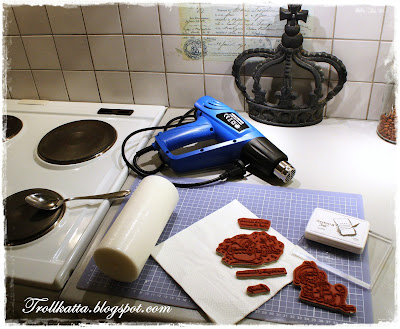
This are the items and tool I`ve used. 
How to decorate a white candle light:
I have a stove and I heat the spoon on it. If you have a gas stove, you can heat the spoon, if you like, 
on a heat gun.

I use white dinner napkins.

Stamp directly at them. Divide them, so it's only the outer layer of paper  you use.
I attach to the candle with the backside of a hot spoon.

Table cards: I`ve used a part of the stamps: Santa riding.. and Elf Maja & Kitty writing Santa`s list
and the edges are aged with Archival Ink - Coffee.

Dinner Napkins: White dinner napkins,
lovely Maja, Santa and December sentiments are stamped on the napkins.

The napkins are folded together so as much as possible of the motifs are visible.


This was the result of the candles :-) Christmas spirit with WOJ :-)
Quick, easy and affordable!

Now Christmas guests can just arrive :-)

Hope you`ve got some ideas how to decorate your Christmas table in this busy holiday season. 
Hope to see you again here, or on my blog :-)

Have you looked through today`s Advent Calendar window
If not, do so and maybe you`ll be the lucky winner :-)

Tuesday, December 11, 2012

Advent Calendar day # 11


Karin Seiness-Lilleseth

Welcome to Day #11 of the 2012 Whiff of Joy Advent Calendar!
Window #11 is opening on Karin`s blog today!
Please visit her blog to see her Christmas creation and for a chance to win a Whiff of Joy prize!

Related Posts Plugin for WordPress, Blogger...