Welcome to my, Louise, tutorial on how to make a purse out of paper. I think this is a fab way to give gifts :)
I have taken lot´s of pictures to make sure you get the swing of things. Hope you bear with me til the end ;)
Here we go:
* Start off by picking your designer papers and matching cs.
* Which occasion is it for? I think you can use this for almost any but you need to decide which one so that you can choose which stamps to use.
Take a piece of the cs you´ve choosen. It should measure width 12 cm and lenght 30 cm.
Along the 30 cm side at 7,5 cm in from each side you create a "flip". The "flip" should measure width 7,5 cm and lenght 15 cm. Click the pick to see better. ;) Cut it out.
Now it looks like this. With the help of a metal ruler and a scor tool you set the scores. If you have a scor board you can of course use that.
When all folds are set it looks like this.
Now you need to take another piece of cs beacuse we are making another one that will look almost the same. But instead a creating a flip you just measure it the same: widht: 12 cm and lenght: 30 cm. Also measure out the flip but don´t cut it out. Fold the same way as before.
Your second piece looks like this after setting the scores. This is what it looks like when you don´t cut out the "flip".
Here´s the big and smaller piece of cs with all edges folded.
When you have made all your folds on the biggest piece of cs you cut along one side using your scissors. It should look like this.
Now it´s time to add designpapers if you like.
TIP: If you usually tear the edges, ink them, add your personal stamp or sew the edges this is the time. It´s very hard to do when glued togheter.
Your two pieces with design papers looks like this now.
It´s time to glue the two pieces togheter. Place glue on the smallest piece, on the "flip" you created.
Place the small piece with the glue on top of the bigger on (with glue down). It looks like this when done right.
Turn it upside down and add glue to the two "flips" of the biggest piece of cs.
Turn it around again. Be careful so you don´t get glue all over ;) Glue the "flips" togheter with one of the sides. When ready it looks like this:
Place lot´s of glue to each of the sides and fasten them togheter. Like this:
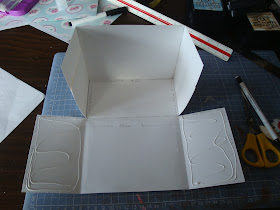
These two pic´s shows you what your purse looks like at the moment. ;) It´s really more like a box without lid or a napkin holder. However if it looks this way you´ve done it right so far. :)
Now we move on to what is to become the lid of the purse. Choose what color cs you want and measure up widht: 15 cm and lenght: 24,5 cm. If you want to make kind of a half circle instead of a straight end you should do that now. I draw mine by free hand.
Make folds at the lenght on 13,5 cm and 16,5 cm along both sides.
Now your lid should look like this when folded. If you want to now is the time to add design papers.
This is what my lid looks like when I added my design papers.
Now you need to make sure the two pieces fits well togheter. Don´t worry! They´re not supposed to yet ;)
Take out your little box again. Here I´m showing you how you are supposed to add pressure to both sides at the same time. That makes the sides go against the middle and the side´s fold, that way the two pieces fits well togheter.You might need to give it some help with your fingers but the fold is to give in "naturally". Here´s what I mean with that:
This is what the purse is supposed to look like after you adding pressure to each side of it.
Place the lid in front of you with the part without design papers up and add lot´s of glue to make sure it sticks to what is to become the back of the purse.
Here´s a pic of what the purse should look like now with the "lid" glued on to the back. As you can see the handbag need a "lock" of some sort. You can use any kind.
Now the purse it self is ready, but you also need a handle, right?
Decide on which color of cs to use for your handle. I wanted to stay with white. It should measure width: 2,5 cm and lenght 30,5 cm. If you want to you can also add design papers to it. If you do, don´t forget to make it smaller. Lenght: 2 cm and widht 30 cm
Take whats going to become your handle and measure it on to the bag, fold it on each side so that the handle get the lenght you want it to have. Glue it in both ends.
This is how you place the glued handle on to the bag. Let it dry so you make sure it stucks.
Now the handbag is ready for some embellishments of your own choice :) There really is no limits to what you can add ;) Flowers, ribbons, stamped images...and so on!


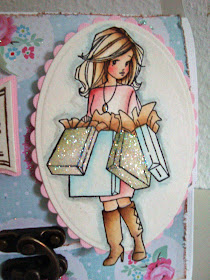
I have inked shopping Willow with distresser on 300 g watercolorpaper. I also added some stickles star dust to the image.
This is what my handbag looks like when finished. I used products from City girl collection. The sentiment comes from the matching City girl sayings and I have also used the die city girl shape.
I´m hope you all liked this tutorial and will find it interresting :)


OMGOSH Louise!! That is a really fantastic Tutorial!! I love how you have so many pictures so you know just how each part should look!! I love it:-) I will be trying this one out for sure!!
ReplyDeleteHugs
Karen
xxxxxx
Awesome & Thanks for sharing this amazing tutorial..... Very adorable..... Wishes & Hugs)))))
ReplyDeleteAsh...
(http://hastkala-oceanichope.blogspot.com/)
Magnifique tuto, ce sac est adorable. Merci
ReplyDelete3 days ago I was looking for a tutorial for a project like this... thanks a lot!!
ReplyDeletethis is such a lovely handbag/ purse, thank you sweetie for this great tutorial hun
ReplyDeleteyour project is wonderful and perfect to the details
hugs angelique
Fantastic tutorial dear.
ReplyDeleteGorgeous bag!
Oh, thank you all for your wonderful support and lovely words:) They really do mean the world to me :) Hugs
ReplyDeleteWAOUHHHHHHHHHHHHHHH SUPER BRAVO MD
ReplyDeleteMerci beaucoup pour toutes ces beautés que tu nous offre si généreusement.
ReplyDeleteBisous. Kathy
Wow this totally rocks x
ReplyDeleteSuperbe
ReplyDeleteMerci beaucoup pour tous les totu que nous recevons
Amicalement
Maïté
this is a brilliant Workshop Louise! Thanks for sharing!
ReplyDeleteBig Hugs Dunja
So cute .. Thanks a lot
ReplyDeleteEve ;)
WOW Louise!!! Your tutorial is amazing!! So clear and easy to understand!!! I need to give this a try!!
ReplyDeleteThanks a lot for sharing your talent!
Have a marvellous week!
How adorable!!! Awesome tutorial.....
ReplyDeleteWill have to try this for sure....thank you for sharing....
Superbe ce sac!! Bravo! Bises. Nadine
ReplyDeleteWhat a fabulous gift idea! This turned out great.
ReplyDeleteHow cute!!! Thanks for the tutorial too!!
ReplyDeleteDebbie B
Your tutorials are so wonderful and I love all of them. Only problem is I have a hard time with cm if you could put them in inches I would make so many more of them. Just something to think about.
ReplyDeleteHugs!
Awesome purse and tutorial Louise!!
ReplyDeleteLOVE it.
Many thanks for all the wonderful pictures for each step - so much easier to understand!
Now if I only knew what cm were!
I am an 'inches and feet' girl.
Hugs, Candy