Showing posts with label Susan. Show all posts

Monday, March 16, 2015

Make A Card Monday


Good morning everyone and welcome to Make A Card Monday at Whiff of Joy!

Today I'm sharing my wedding card I've created:


For this card I've used Happy Couple In Love which you can find in the Whiff of Joy shop. I had so much fun coloring this image. I colored them up with my Copic Markers. I did a bit of layering with them and the hearts. The circle cut around them is a My Favorite Thing die cute. I used several different doilies under the circle. All of these papers are scraps! I added some large white pearls on the smaller doilies and then some red pearls. I added some Opaque White detailing and some red glitter on the large heart. I used several different stamps from my stash. on the inside I used a Memory Box border die and the negative hearts were used as well. Thanks for looking!!

Copic Markers Used:
  • Dress, Stripe and Tie: Y13, Y15, YR04, YR09, R24
  • Hearts, Rose and Ears: R20, R22, R24, R29, R59
  • Tuxedo: C3, C5, C7, C9
  • Henry: W00, W1, W3, W5
  • Henrietta: 0, E30, E31, E35, E37

Saturday, November 8, 2014

Scrap Your Stash with Susan


Good morning!!  And Happy Saturday! Yay!! It's the Weekend again! I love the weekend! It should be much longer though!

Today I'm sharing a Whiff of Joy project with you using a non Christmas image, but I made it a Christmas Card. This is little Thinking of You Maya from the Whiff of Joy Shop. So, she is writing a letter to Santa :)  I thought it worked! 

I colored her with my Copic Markers. I did a little bit of decoupage... the kitties head, her head and arms and the envelope. These papers are all papers from last years Christmas creations. I am trying to use up all of my Christmas papers instead of buying new... which I thoroughly enjoy doing LOL  So, with last years Christmas papers I have cut the stamp shape for the card, the stamp shape top with the santa paper, the red paper I distressed the edges. Everything is really old that I've used for this card. The dew drops are the newest item and I think they are at least 6 months old in my stash. The flowers, the gems, the twine... Yep.. they are all WAY OLD!!  And the soda can top is recycled. I covered it with gold UTEE. And for the sentiment... I have tens of thousands of fonts! Crazy I know.. but I have just about anything you would ever want... so I created Dear Santa in a child like font and printed that out. Thank you so much for taking the time to look!! 


Copic Markers Used:
  • Skin: E000, E00, E01, E11, E13
  • Hair: E21, E97, E99, E39, E59
  • Cat: W00, W1, W3, W5, W7
  • Pants: B93, B95, B97
  • Stamp on Envelope: B24, B26
  • Paper and Socks: E40, E41
  • Pens: C3, C5, C9
  • Shirt and Hair Tie: RV05, RV17, RV19
  • Tongue: R20, R22

Tuesday, September 9, 2014

Tag, You're It Tuesday


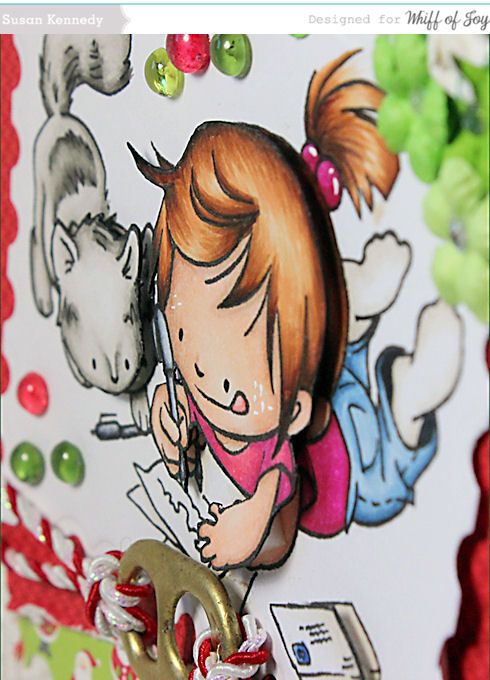
Today is Tag, You're It Tuesday at Whiff of Joy!! Each Tuesday, one of the Whiff of Joy Design Team Members will find a creation from one of you and use that as her CASE to create from. Where do we find your projects? We look on the Facebook group, Pinterest, Instagram or those of you that are entering the Whiff of Joy challenges! If you are sharing a Whiff Of Joy project through social medias, please remember to tag with @whiffofjoy and we will find it!!

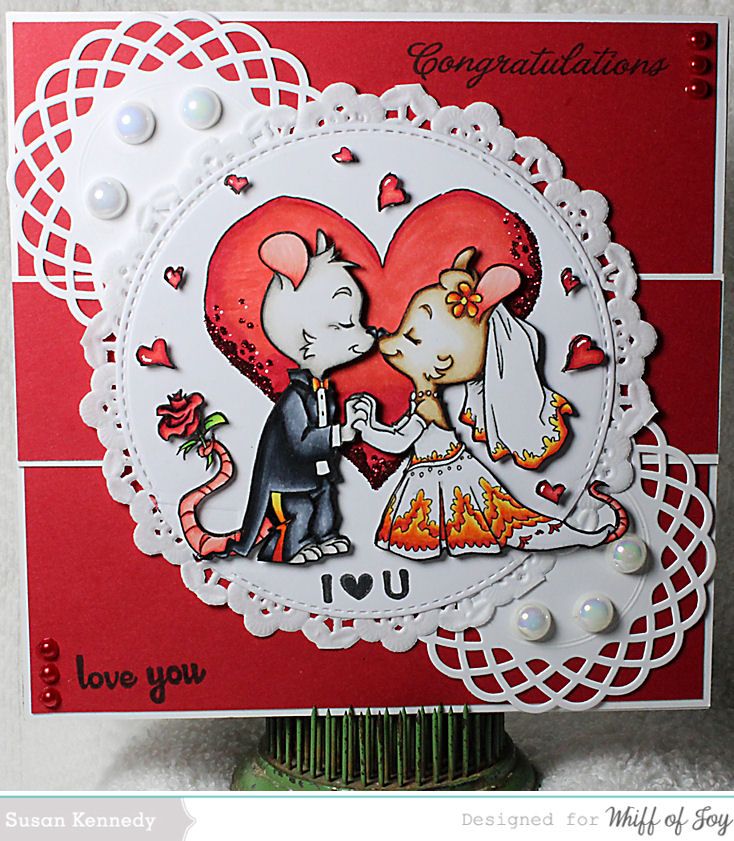
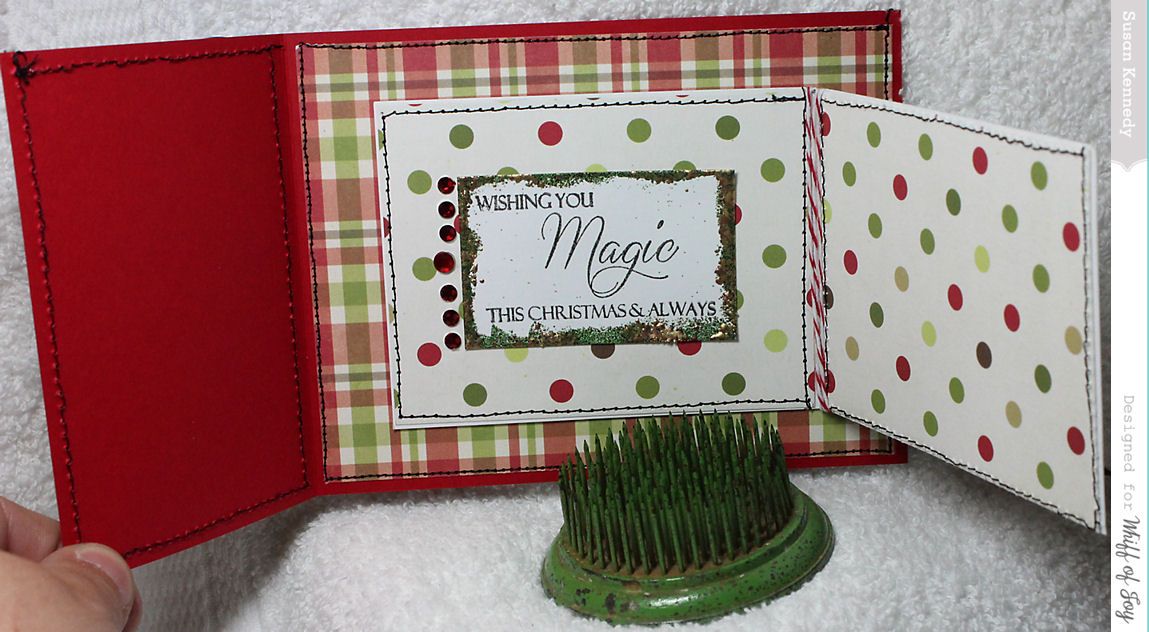
For this Tag, You're It Tuesday, I have chosen this beautiful creation from Ellabella:


I absolutely love her creation!! I fell in love 
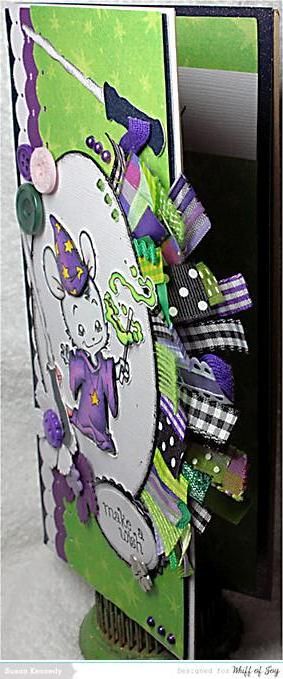
with the design. I love the tall or long cards. I think they look great. I also love the layer of ribbons and the buttons! Absolutely love it!!! For CASEing this card I used the idea of the design as a whole. Love it!  And you should see all of Ellabella's creations! She is so talented!! So, here is what I came up with:


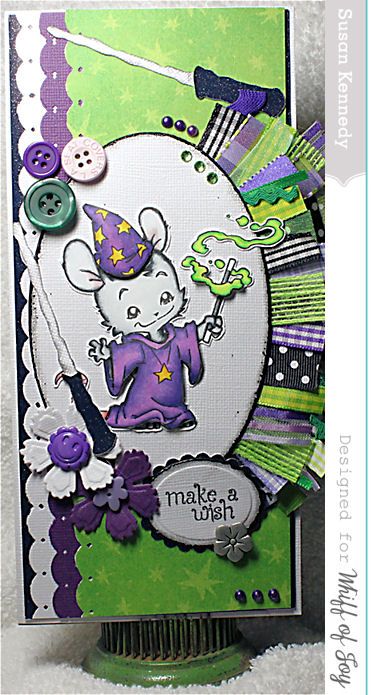
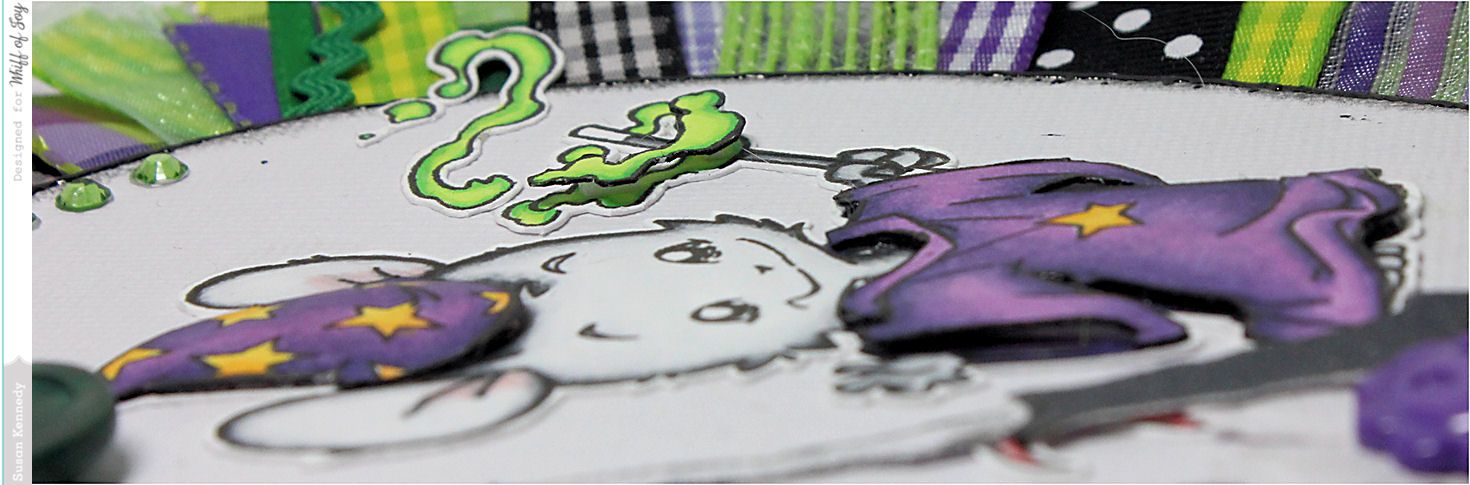
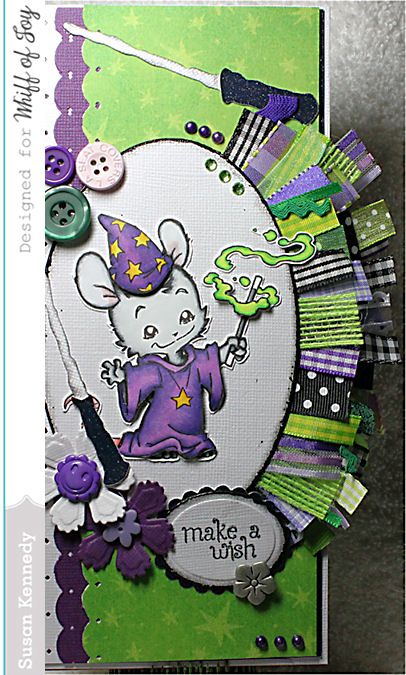
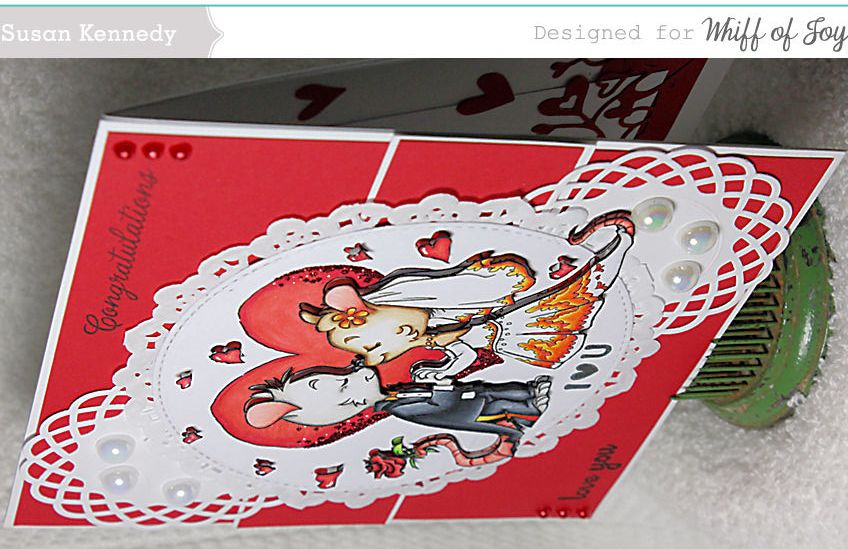
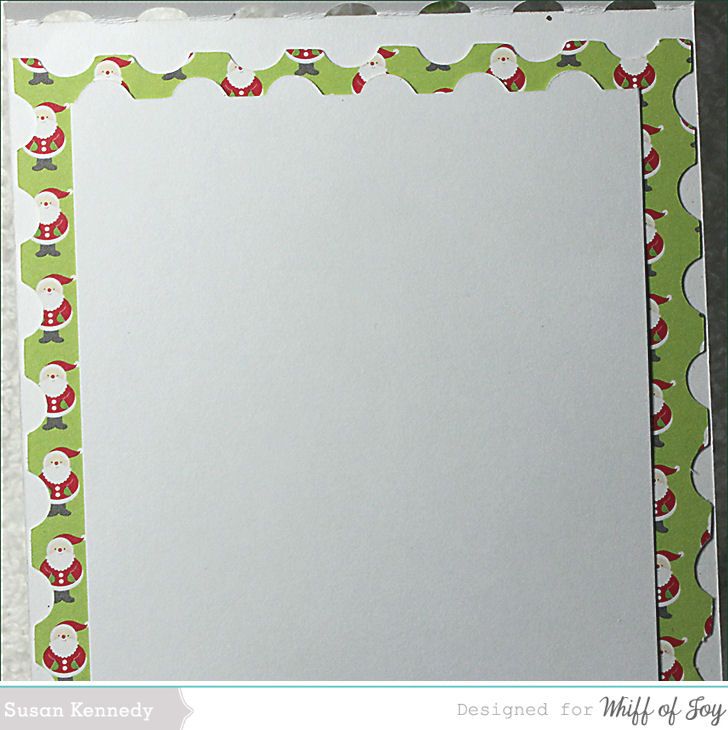
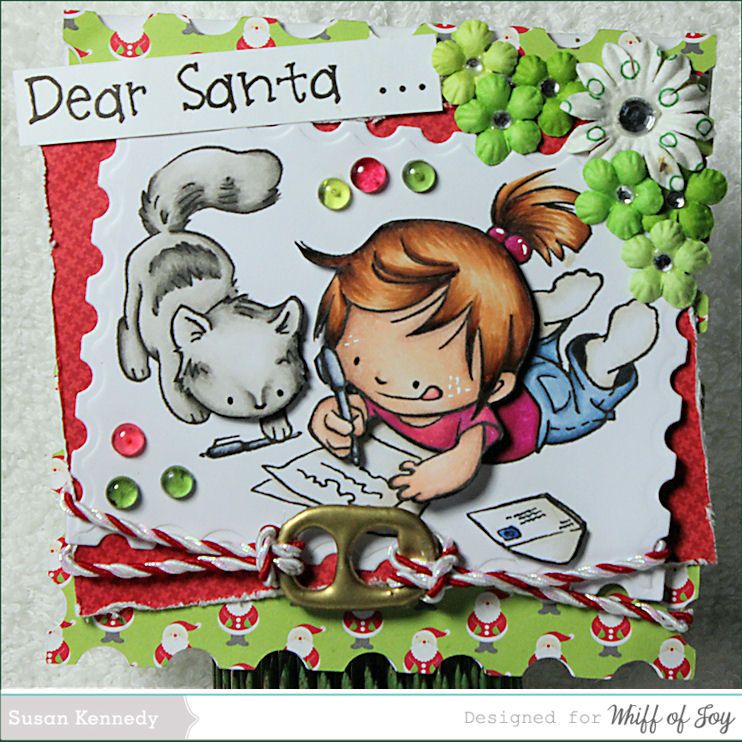
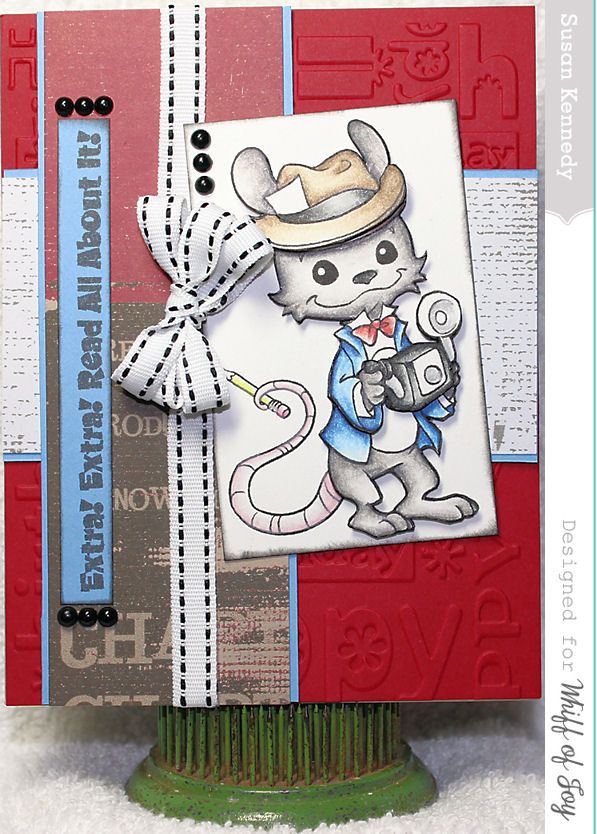
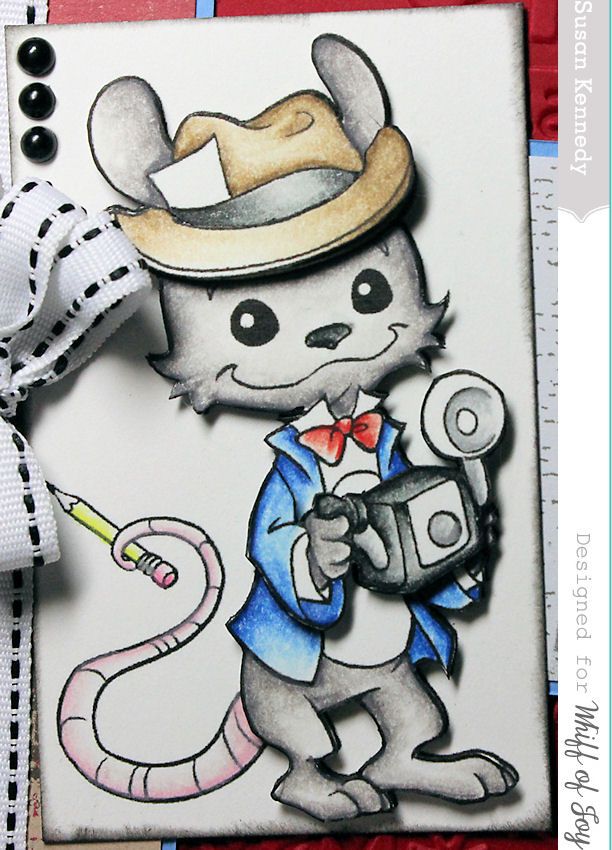
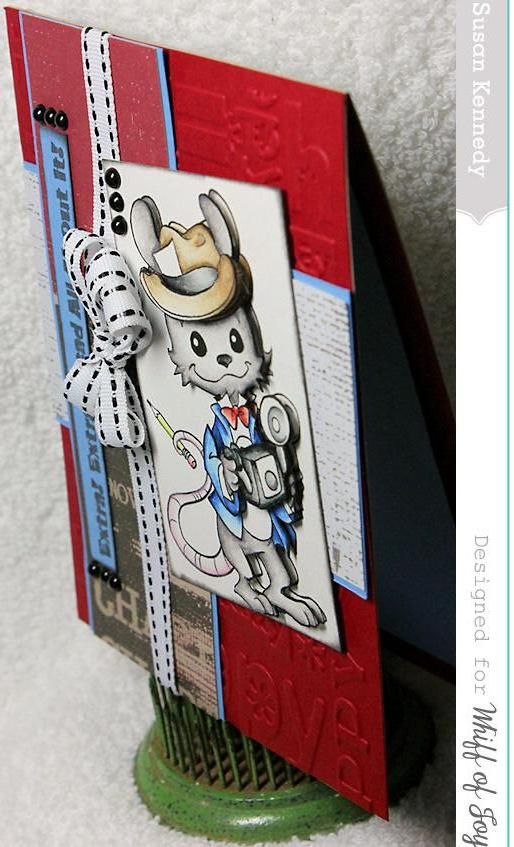
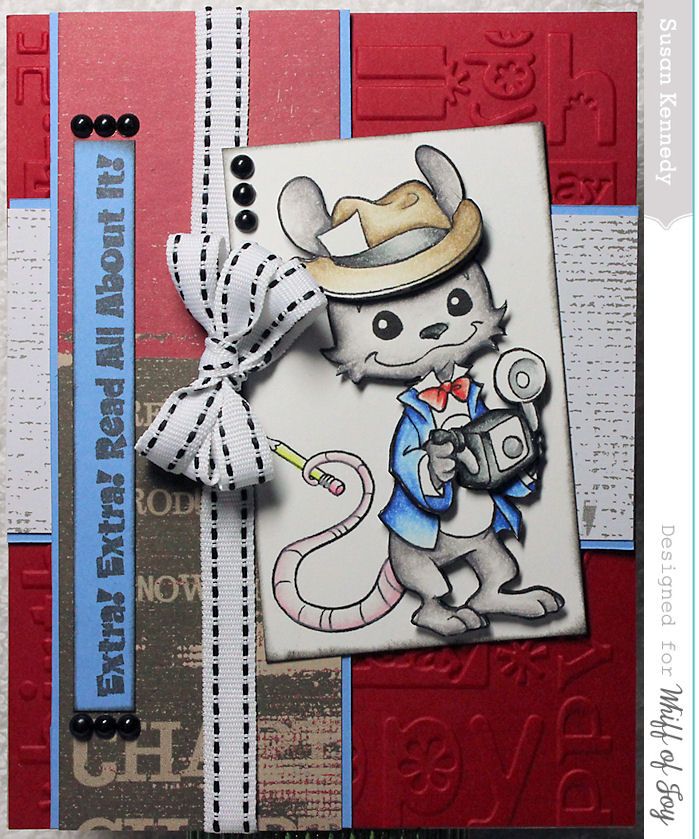
My color scheme is way different LOL I used one 
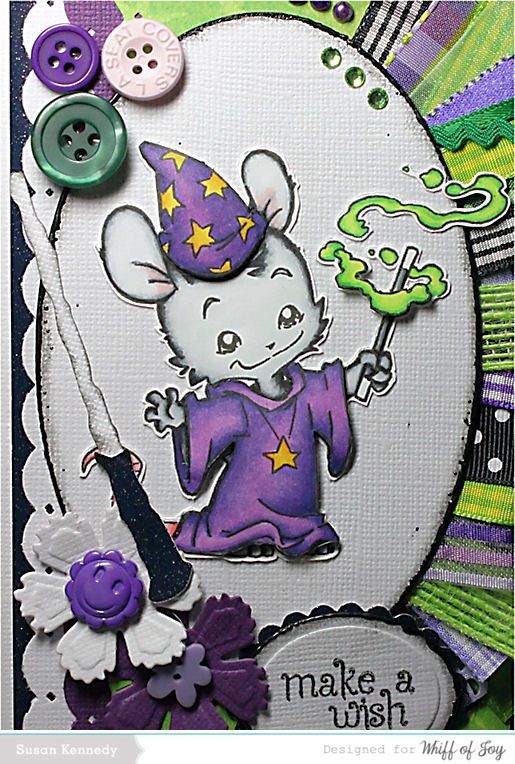
of my punches for the edge. I used a Spellbinders die for the flowers, I picked out lots of different ribbons and ric rac. I added pearls outside of the oval and at the bottom of the card. This is the first time that I have attempted to color pearls with my Copic markers and i LOVE it!! It colors so smoothly and evenly. I think they turned out great! I didn't have purple, so that was the option.. color! LOL  I used green gems for the inside of the oval. On the edge of the large oval and the small over I embossed with black embossing enamel and I inked 
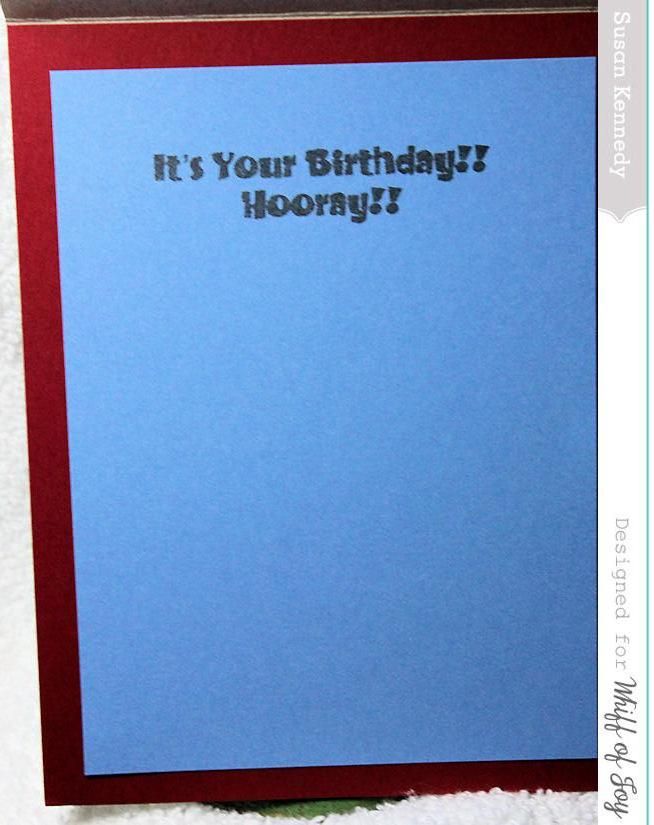
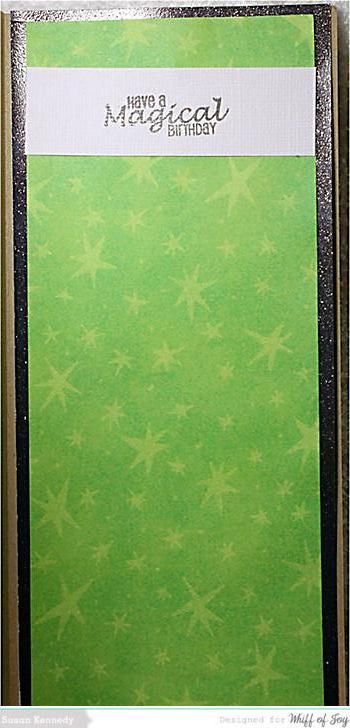
the very edge as well. The sentiments are stamped. The centers for the two flowers AND the metal flower on the outside sentiment are all buttons as well as the obvious ones at the top of the oval. LOL! I cut out the two wands from a Silhouette Cameo cut. The ovals and the 
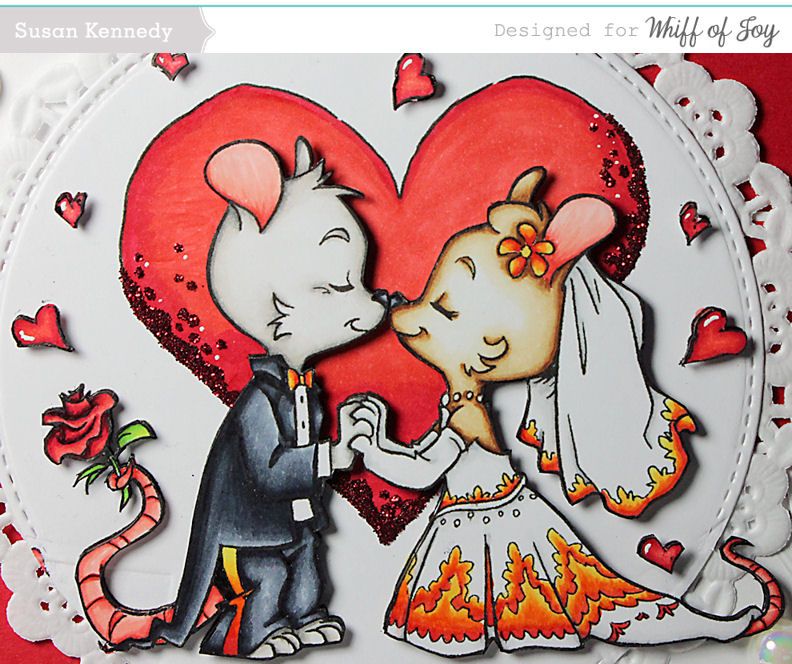
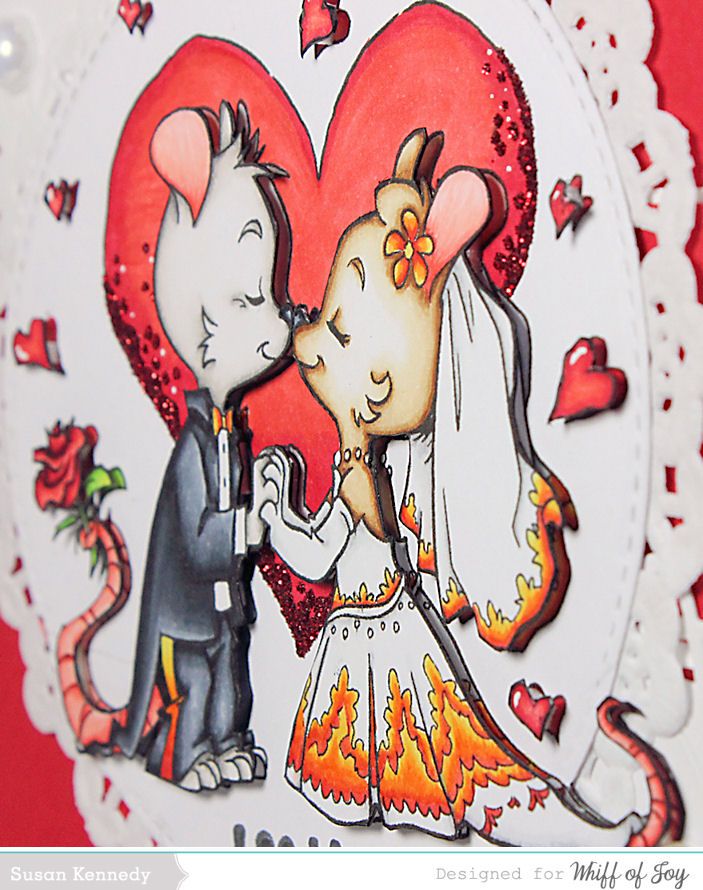
scalloped oval are all Spellbinders dies. The wonderful image is 
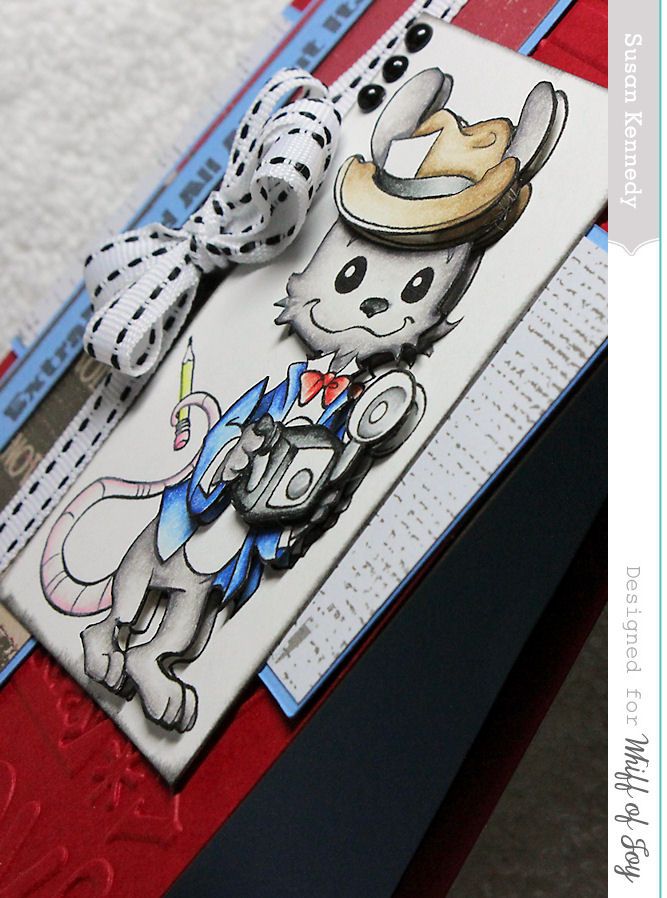
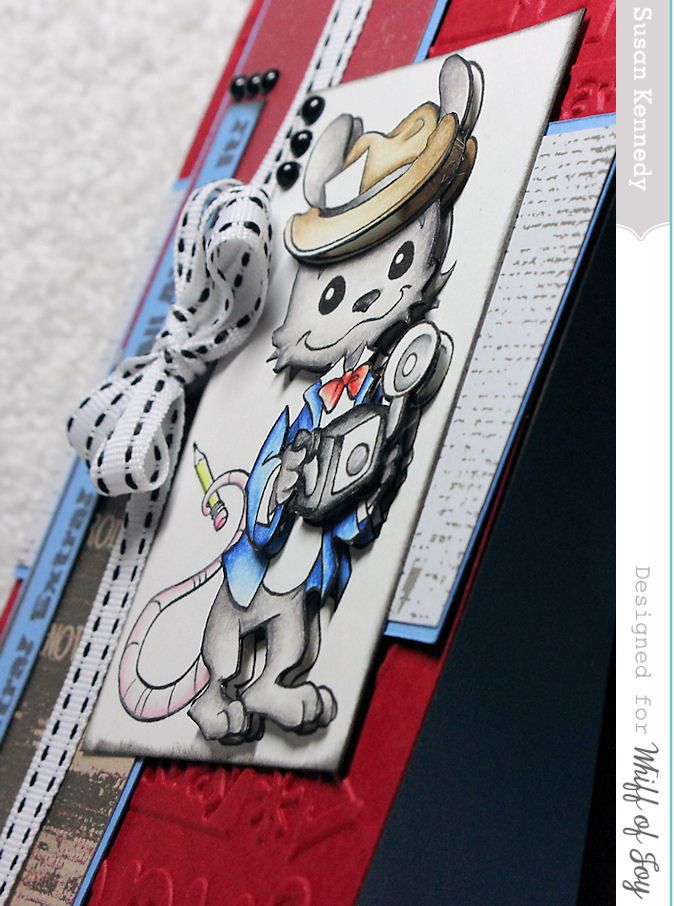
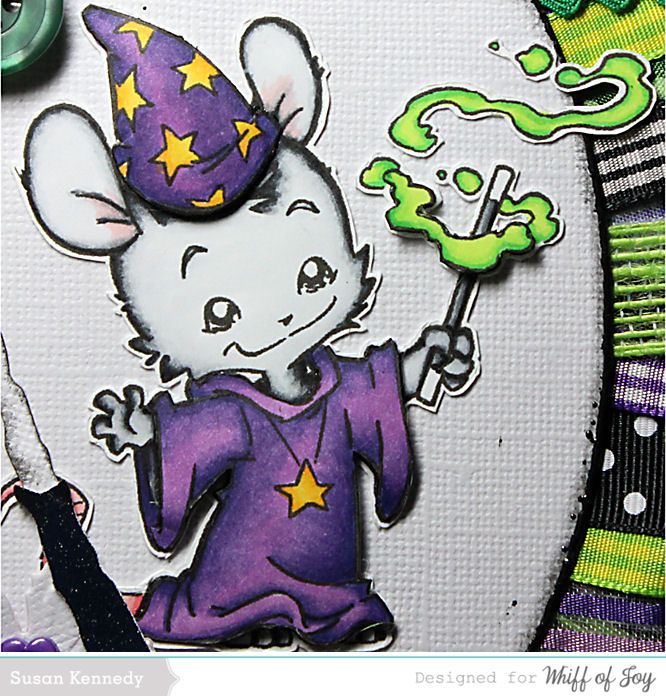
Merlin Henry which you can find at the Whiff of Joy shop. I colored him with my Copic markers. I did do a bit of decoupage... the hat, the outfit and part of the magic spell.

Copic Markers Used:
  • Hat and Robe: V15, V17, BV08
  • Henry: N0, N1, N3, N5, N9
  • Wand: N3, N5, N9
  • Tail: R20, R21, R22
  • Ear Pink: R20
  • Stars: Y15, Y19, Y38
  • Magic: YG01, YG05, YG09

Monday, July 7, 2014

Make A Card Monday - Christmas in July


Good morning everyone! And happy start to a new week. I hope you all have a great one! Today I am sharing one of my Christmas cards. I have been trying to get some Christmas Cards done each month.. at least one! I'm not exactly sure how I have done, but I have managed to get another one finished. For this one I used Christmas Henry Wrapped Up. I decided on a Joy Fold Card. It is one of my favorite cards to make.


I used the Christmas Henry Wrapped Up. I used all scraps of paper that I had in my box. I colored the image with my Copic Markers. I added twine to the center fold on the card and I also added it to the button on the front. I decoupaged Henry a bit. I popped the bow one level and then I popped the bottom ribbon of the bow and his feet one more level. I added gems to the inside next to the sentiment, which also has been heat embossed around the edge with Aged Green Embossing Enamel. I did also stitch around the papers on this card.

Have a wonderful day everyone and happy crafting!

Friday, May 9, 2014

Color Me Happy Friday!! with Prismacolor Pencils and Gamsol


Hi Everyone!! I'm Susan Kennedy and I am so happy to be able share with you on this wonderful Friday for Color Me Happy! I'm excited to share this card with you using Reporter Henry:


For this card I used Reporter Henry from Whiff of Joy. I colored him with my Prismacolor Pencils and Gamsol. I printed the image several times and I colored each one so that I could decoupage a bit of him. I also inked around the edges with black ink. The papers are from a really old Club Scrap box. I added the ribbon which I tied with three loops. I created the sentiment and added the pearls next to the sentiment and on the image. I also embossed the background, red paper with a Happy Birthday embossing folder. I completed the sentiment on the inside and that is simply it. I love the shading that I got with the pencils and Gamsol with this image. And I think the decoupage added that much more to it! And I LOVE Henry!!


Prismacolor and Gamsol:  I have found that when I'm using Prismacolor pencils and Gamsol, that you really don't need much pencil. The best way to get the shading that you want is to apply a darker line of pencil right around the edge. Then you use the Gamsol to pull the pencil from the edge which creates that magnificent shading. I have also found that it is much better to use less pencil and add if you need to. It is nearly impossible to remove too much pencil line.
Related Posts Plugin for WordPress, Blogger...