Showing posts with label Stacy Morgan. Show all posts

Wednesday, December 18, 2013

16 Days of Christmas Day #14


Hi, this is Stacy and it is Day #14 of Whiff of Joy’s 16 Days of Christmas Stockings.  I would like to share my stocking creation with you today using the sweet stamp Elf Maya and Kitty writing Santa's list. I stamped my image onto white card stock and colored with various Copic Markers. Once my image was colored I cut around the image and added dimensionals to the back. My stocking is free hand drawn onto computer paper and cut out and used as a template that I traced on light blue card stock for the back and designer paper for the front.  Added some crochet white lace and blue ribbon around the front of the stocking. Adhered the two pieces together and then pierced around the edges. Added some Pearl Brads Basic Blue to the edges and some bells with silver cord. The top of the stocking has a fun edge using Die-Light Nostalgia Border. A little bit of sparkle and Voila!


  • Whiff of Joy will be giving away this Elf Maya and Kitty writing Santa's List to one lucky winner. In order to enter, please leave a comment at the end of this post. You have until 8am tomorrow to enter. We will be posting the winners on the Whiff of Joy blog so remember to check every morning.
Thanks for joining me for our 16 Days of Stockings. Have a wonderful day! 

List of Supplies used for stocking:
Elf Maya and Kitty Writing Santa's List
Light Blue Card Stock 
Nostalgia Die Light
Pearl Brads Basic Blue

Thursday, March 21, 2013

Stacy's Stamping Space

Good morning! Today you are going to see my, Stacy's little stamping space. My stamping space is in the spare room in our house which I share with a few bookcases, Ranger's bed or one of his many beds among a few other things. My husband and father in law built me a desk, shelves and cubbies to hold all my goodies.

If you are coming directly into the room this is what you see first thing. yes, there is two computers on the right as can see as I share space with our office computer.  :0)  The laptop is for bloggin and playing around on the internet. Rather nice to have the two monitors at times I do have to say. yes my desk is messy and I didn't clean it up much so you could see how it really looks. My Silhouette machine is to the right by the laptop along with my drawer cabinet that holds brads, buttons and little things. In the drawers you see by the chair is where my solid colored paper is stored. I have divided the colors from lights and darks between the drawers, this is a great system for me that works. My Copic markers are to the left of the calendar that are housed in a turned sideways pencil holder from staples. This has been the easiest way for me to hold them and easy access.
The top two shelves hold a lot of my crafting stuff within arms length. The top shelf from left to right is creations that friends have sent me, bottle of primas, three bins that hold spooled ribbon and loose ribbon, storage boxes for stamps and then alterable items. I keep a lot of things to alter for gifts and just for fun. The bottom shelf from left to right is my cuttlebug folders, copic refills, rhinestones and misc tuff, envlopes and designer papers.
 
Now this is where I store all my stamps. 9 feet tall with two sides, each cubby holds a bin that stores stamps by company. Too many stamps? I would have to agree as I am working on going through and giving large amounts away to loving homes.  ;0)   Don't tell hubby I said any of that. hee hee  Well that is my little stamping space that I cherish. Hope you enjoyed sharing in my little space today. Have a great day.

Wednesday, February 6, 2013

Belly Band tutorial

Hello, Stacy here with a belly band tutorial. I am also going to show you a *sneak sneak peek* of a New release stamp coming this February called I will take care of you featuring the adorable Maya. So let's get started.

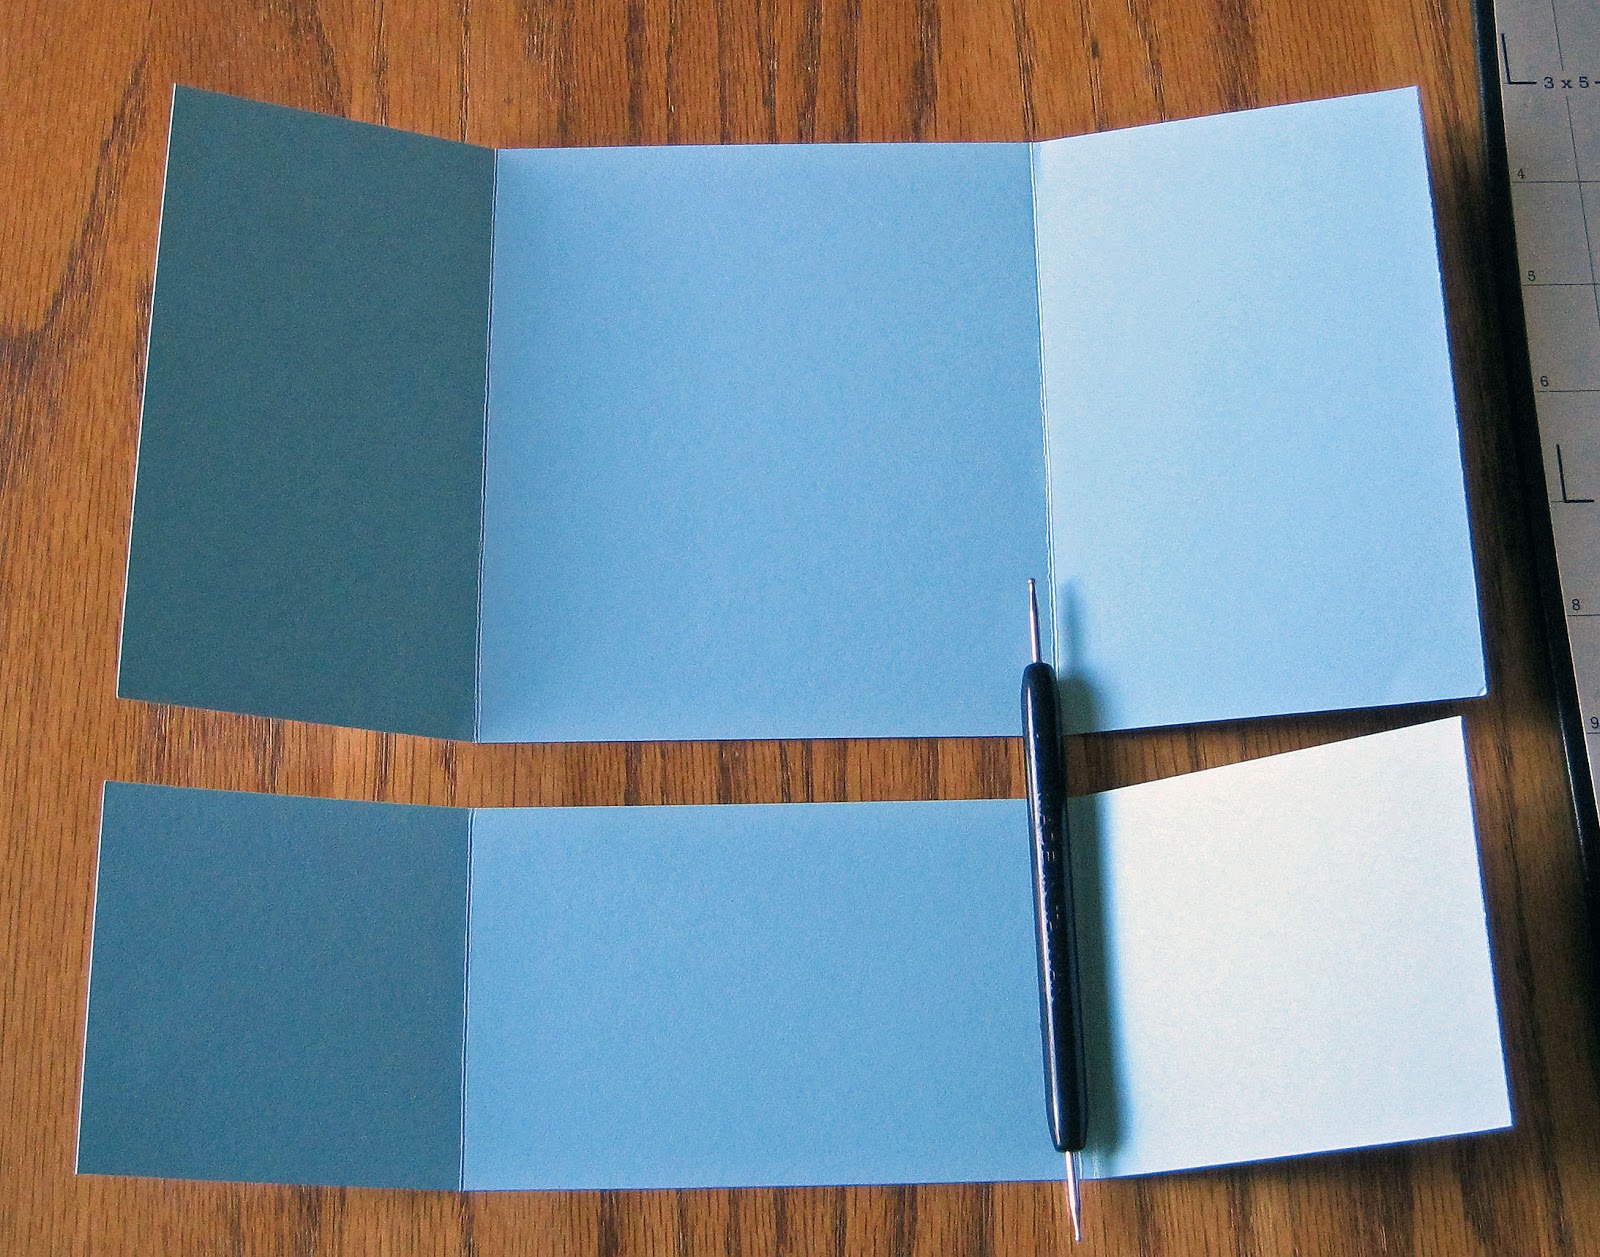
 You will need a few things for this tutorial. 1- 8 1/2 x11 sheet solid cardstock, designer paper at least 6x6 in size, scoring tool, dies, stamp, embelishments and adhesive.
 
Take your 8 1/2 x 11 sheet of cardstock and score at 3 inches and 7 1/2 inches. Now turn your paper so the shorter side (8 inch side) is at the bottom and cut your paper at 5 1/2 inches. Then turn both sheets back length wise and it should look as below. Set your smaller piece to the side to work with later.

Turn your main piece of cardstock over as we will decorate the back. I have layered another solid color and then a designer piece on top. If you choose to stamp your cardstock then this is where you would do this as well. You will want to keep in mind that anything sticking up such as pearls or jewels will grab when you are pulling the belly band piece down, so limiting that to flat embelishments is strongly suggested.

This is what it will look like when you adhere your designer pieces of paper. Now set aside the base and we will work with the band portion seen below. I have taken the band portion and cut 1 inch off the length to make it a little thinner. You can keep it as wide as we had it cut or trim it down, just personal preference for the image you are using. A decorate design is added here and I choose the beautiful heart lace border for mine.

Then we add designer paper or stamped images if you would like. Mine has a solid base again and some designer paper. Don't worry about the seem when you over lap the papers as you will not see this when the bell band is closed.
Flip your band over and place your main card piece we set aside in the middle. You will want to line up hearts when you fold it over and it will be tight fitting, that is what you want. See how the hearts are lined up when they over lap? The seam will not be seen again so don't worry about that portion.

Now that you have your belly band closed you will add a panel that you will slip on and off. I have used a Spellbinders shape for my panel along with some Twiner pieces that I punched out. They will be hidden under my panel so I am not too worried how they are adhered to the base panel.

Now I add my stamped panel over the belly band panel and decorate as I wish. Here is the final result. You have so many options on how to decorate its really fun. See the twinery sticks out the sides and I added some rolled roses to the sides and my sentiment tag. My sentiment is from General Stayings II.  

When you take the belly band off this is what it will look like. On the inside I have added more of the designer paper to my message piece to complete my creation.
Hope you enjoyed the tutorial and have fun playing. Happy Stamping!

Tuesday, January 15, 2013

Valentine Treat Box Tutorial

Good morning, Stacy here with a fun little valentine treat box tutorial for you. I am using this adorable robot called Beep Beep, I Love you. Here is the supplies you will need for your box. 2 8x11 sheets of solid color paper, 1 sheet of designer paper, Desired shape in 3 stages, adhesive and embellishments.  
First thing you will need to do is die cut out (2 pieces) the lid and the base using the largest shape you choose. I am using Spellbinders Label one shape today. Die cut out the designer piece in the second largest shape now as well.
Set aside these pieces for now. To create your box lid and box base you will need 2 piece of solid color paper. Cut  them in 4x4 inch piece of paper for both. Once cut score at 1/2 inch on all 4 sides of each piece of paper as shown. Fold the edges and cut the two ends to create the tabs for the box.

Add your adhesive to the little tabs and also to the bottom of each box. This is what will adhere to your die shapes we cut.

Remove ONLY the side tabs to create your box. Leave the large strips to adhere in a bit. See picture below.
Once both boxes are created you will remove the center adhesive from one and center onto your die shape as shown.
When adding the box to the lid portion I place the box onto of the bottom as shown below. This works better for me when I attach the lid base for centering all edges evenly.
Your box now should look like this and ready to decorate!
Here is my final creation all decorated. I added some lace trim and ribbon along with some pearls for fun. The flowers and his heart have a little bit of sparkle added to them also.

This might be the little project I make for the twins classroom this year for Valentines day. :0)   Hope you enjoyed the tutorial, happy creating!

Sunday, December 23, 2012

Cocoa Mitten Tutorial

Afternoon everyone, this is Stacy and today I have a fun tutorial for you for making a  hot cocoa mitten. These are wonderful little gifts that are perfect for teachers, friends, neighbors and more. Here are the supplies you will need today: Designer paper, solid cardstock, ribbon, cord or twine, snowflakes, adhesive, and a stamped image.  

For the template of a mitten I simply hand drew one by placing my hand onto a piece of computer paper and drew around my fingers to make it look like a mitten with the added little lips on the bottom sides. Once you cut out the shape you will trace that onto a solid colored piece of cardstock and then trace another one onto a designer piece of cardstock. The solid is for the backing and I tend to use a sturdy piece of cardstock as it will hold the cocoa better when presented as a gift.

Next you will add your adhesive to the outer layer of the solid cardstock as shown. You can do most of the thumb as nothing will be in that spot and it adds to the sturdy feeling of the mitten.

This is what it will look like before decorated and with the hot cocoa package inside. You can add some stitching to the border if you want here or leave it as is. Marion has a wonderful tutorial on stitching by hand found HERE. I will probably go with a faux stitching on mine as I am limited on time with Christmas just a few days away.


This is the finished product when decorated. I used the adorable Cute Snowman that I stamped onto white cardstock using memento tuxedo black ink. I have colored him with various copic markers that I then layered on to a scallop circle. My ribbon is tied around the bottom with some silver cord and a few little bells.  
 
Lastly I added a few felt snowflakes with some jeweled centers. Thank you for joining me today and hope you enjoy making a few mittens of your own. Have a wonderful day!

Tuesday, December 18, 2012

Advent Calendar Day #18


Welcome to Day #18 of the 2012 Whiff of Joy Advent Calendar!
Window #18 is opening on Stacy's blog today!
Please visit her blog to see her Christmas Creation and for a chance to win a Whiff of Joy Prize!


Related Posts Plugin for WordPress, Blogger...