Friday, May 27, 2011

Inked sky by Alice

Hi all! Alice here to share a quick way to create sky/clouds on your image. Here is a look of the finished image. I used the super sweet Friends Forever - Nora and Ben for my sample.


Here is how I created the sky on the image:


You will need:
  • Stamped image. I colored and die cut mine, but you can do this either before or after coloring. I chose not to mask my image, but you can mask yours if you are afraid to get too much ink on the colored image.
  • A sheet of plain printer paper.
  • A pair of scissors.
  • A pencil.
  • Ink and ink applicator.


First, hand draw a few rows of scallops/cloud shapes on the printer paper. I drew four different ones here.


Cut the scallops out. I ended up cutting out only three of them and decided to ignore one of the hand-drawn pattern and free hand cut it instead.


Lay a scallop strip over your stamped image. I always start at the top of my image.


Start applying ink. I decided not to mask my image and just start with very light hands. You can lift the scallop strip up and see of there is enough ink and add more ink if desired.


Keep moving your scallop strip or switch to a different strip for a varied look as you move down to your image.


Here is a finished image. I had inks on Ben's hand, but it was light and I decided to ignore it. =) You can use your cut out scallops/cloud shapes over and over again.


Here is a look of the finished card. The sentiment is from the General Sayings II set. I added shadow after inking the sky/clouds.

Hope you will give this a try. Thanks for stopping by! =)

hugs,
alice

Wednesday, May 25, 2011

Copic Coloring Video

Happy Wednesday! This is Jeanette and I have a quick coloring video for you. I still get loads of questions on how I color the faces and hair of the lovely Whiff of Joy images so I put this together. Happy Viewing!

Copic Colors Used:
  • Face: E000, E00, E11, R20
  • Hair: E50, YR31, E33
  • Colorless Blender 0
Have a fantastic day! Thanks for swinging by!

Monday, May 23, 2011

Decorating scraproom by Murielle

Hello everyone, Today, I show you my project this month. I create a triptych to decorate my scraproom. I hope you enjoy. 


You will need:
cardboard, a form that will serve as patron and fancy papers.
For the first part, cut the shape as shown below.


For the second part, we must cut a 18cm circle and a circle inside it 14cm (use a compass to draw circles).
To cut the circle from the inside, use a clure.


For the Third part, draw in pencil and cut around the die.

Cut and paste fancy papers on different cartons We come to prepare the above.
Cut out different models to decorate tripyique dies.


Assemble the various parts with tape and decorate.


This is the result

Thanks for stopping by!
Hugs, Murielle

Friday, May 20, 2011

Geschenktasche mit Innengestaltung / Gift bag with interior design by Dunja Dücker

Hallo Zusammen,

ich bins, Dunja. Ich hoffe, Ihr hattet eine tolle Woche.
Heute darf ich zum zweiten Mal ein Tutorial als Gastdesigner zeigen. Ich hoffe es gefällt Euch.


Hi Everybody,

it's me, Dunja. I hope you had a great week.
Today I can show you a second tutorial as a guest designer. I hope you like it.


Das braucht Ihr / here is, what you need

Scorpal
1 x Cardstock 15 x 27 cm      6" x 11"
1 x Cardstock 15 x 19 cm      6" x 7"
3 x Designpapier 4,5 x 14,5 cm      2" x 6"
4 x Designpapier 14,5 x 3,5 cm      6" x 1"
1 x Designpapier 12 x 7 cm       5" x 3"
Whiff of Joy "Ein kleiner Gruß"
Spellbinders "ovals" and "scal. ovals"
Lochzange / Punch
Satinband / Satin ribbon
Spitze (beige) / Lace (beige)
Blümchen / Flowers
Knopf / Button
Kleber / Glue
Straßsteinchen zum Verzieren / Rhinestones for decoration
Stanzer zum Ecken abrunden / corner punch
doppelseitige Klebeband / double-sided adhesive tape


Als erstes habe ich die beiden Cardstock-Zuschnitte gefalzt.
15 x 27 cm --> bei 4cm, 19 cm, 23 cm 
6" x 11" --> 2", 7", 9"
15 x 19 cm --> bei 4 cm
6" x 7"  --> 2"

First I folded the two cardstock blanks.
15 x 27 cm -> at 4 cm, 19 cm, 23 cm
6" x 11"  --> 2", 7", 9"
15 x 19 cm -> at 4 cm
6" x 7"  --> 2"

 Anschließend werden beide Teile miteinander verklebt.

Put both parts (bonded) together. 

Dann sieht es so aus:

Than it look like this one:

Nun werden alle Papierzuschnitte an allen Seiten gewischt. Ich habe dazu Distress Ink "Vintage Photo" verwendet.

Now the paper cuts are wiped from all sides. I have used Distress Ink Vintage Photo. 

Ich habe den Text"ein lieber Gruß von Herzen" abgestempelt und ihn mit dem zweitkleinsten Stanzteil ausgestanzt. Um einen Rand zu bekommen, habe ich das passende Gegenstück der gewellten Ovale benutzt und dann zusammengeklebt.

I stamped the text "a warm greeting from the heart" and cut it out with the second smallest oval of Spellbinders. To get an edge, I used the matching counterpart of the scalloped ovals and then glued together.

Jetzt werden die Seiten mit den Papierzuschnitten beklebt. Dies ist der äußere Teil.

Now the sides are covered with paper blanks. This is the outer part.

Nun werden die beiden Löcher gestanzt, an dem der Tragegriff aus Satinband befestigt wird. Dazu habe ich genau auf dem Falz gelocht. 

The two holes are punched on which the handle is attached with satin ribbon. In addition I have drilled exactly on the fold. 

Jetzt wird das Band durch die Löcher gezogen und auf der Innenseite festgeklebt. Danach habe ich den Magnet am Deckel angeklebt. (Man sieht ihn später nicht mehr, da noch das Designpapier darüber geklebt wird.) 

Now the tape is pulled through the holes and glued on the inside. Then I glued the magnet to the cover. (You see him later no more, there's the pattern paper is glued on it.)

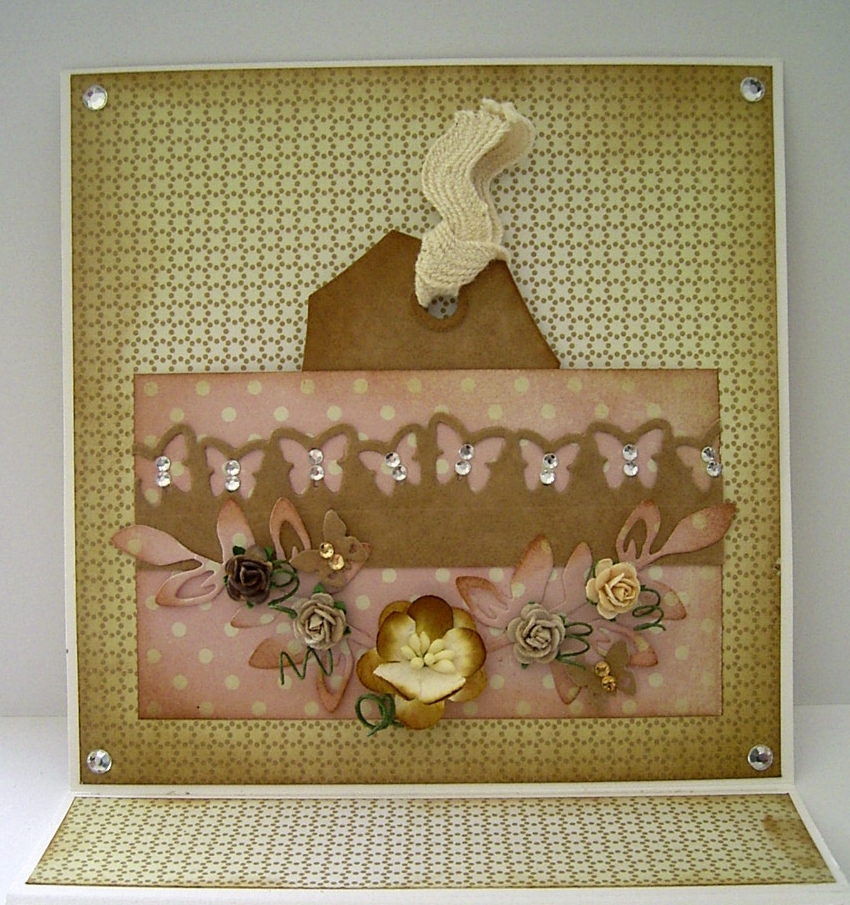
Die Innenseiten werden ebenfalls mit den Papierzuschnitten beklebt. Danach habe ich das Motiv aufgeklebt und dekoriert, wie z.B. mit Blumen, Straßsteinchen usw.

The inside pages are also covered with paper blanks. Then I glued the motif and decorated, such as with flowers, paste stones, etc.

So sieht die Verpackung dann zum Schluss aus. 

Now the gift bag is finished. 


Das Motiv habe ich mit Distress Ink's coloriert.

I've coloured the image with the distress ink's.


Die Tasche für das Tag:
Ihr klebt es einfach nur an den beiden kurzen Seiten und unten an, dann kann man das Tag oben einstecken.

The bag for the tag:
You simply stick it on only at the two short sides and bottom, then you can insert the tag above.


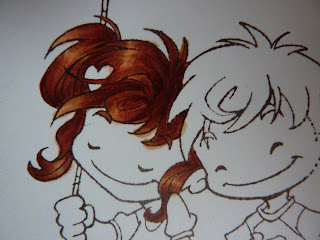
Wenn Ihr Euch das Bild genau anseht, dann könnt Ihr erkennen, das ich die Seile der Schaukel mit dem Knopfgarn nachempfunden habe. :)

Have a look at the picture, then you'll realize that I have modeled the ropes of the swing with the thread. :)


Vielen Dank, das Ihr mein Tutorial angesehen habt. Ich hoffe,es hat Euch gefallen und Ihr probiert es mal aus. :) 

Ein schönes Wochenende  


Thanks for looking. I hope you enjoy it. 
Have a wonderful weekend!


Hugs Dunja x x x


Colouring Red Hair With Copics by Jane Johnson

Today I'd like to show you one of the ways I colour red hair with copics. I get a lot of emails about copic colouring, particularly about colours I've used and how I get the hair to look glossy, so I thought I'd share one of my favourite techniques with you! I have coloured the oh so cute Friends Forever, Ben & Nora image from the new release.

First I add the main hair colour, in this case I am using E17. Apply the colour with feather strokes following the lines of the hair and leave space to add further colours where there would be a natural shine on the hair. (for example at the ends, a halo effect around the top of the head and the middle of curls).


Next I take a lighter shade, in this case E13 and colour over the top of the first colour but take it further into the white areas.


Next, take the lightest shade that will be the highlights and colour all of the hair to blend the previous colours. I have used E02.


Next I add E47 to the areas that would be the darkest to create more definition. (for example the area around the hair parting, the start of any curls and any areas that are underneath other locks of hair).


Next, I tone the dark red areas down by going over them with E35 (take care not to go over the highlight areas).


Then I tone the highlighted areas down by going over them with E53 (take care to only use on the highlights or you will take away colour on the darker areas).


Once I have given all of the hair a "base" colour I go over the areas again to create individual hair strokes. The picture above shows how it looks when I have added individual hair strokes with E17 using light feather strokes following the direction of the hair.


I do the same again with E35 to complete the look.


Here is the completed image on a card! I hope you have enjoyed my tutorial and that it is useful to you. For further details about my card please see my own blog.


Jane x

Wednesday, May 18, 2011

Stamping & More #16 video – a bookmark for dad by Katharina Frei

Every wednesdayA quick and easy way to show someone your appreciation. I created this bookmark for my dad, who loves to read.
Have fun watching!

---------------------------------------------
Eine schnelle und einfache Geschenkidee. Dieses Lesezeichen habe ich für meinen Vater entworfen, der viel und gerne liest.
Viel Spaß beim Ansehen!
bookmarkForDad


bookmarkForDad1 bookmarkForDad2
materials
Stamps: Whiff of Joy (Cool Oakley, German sentiments "Ein kleiner Gruss")
Paper:300g watercolor paper (Canson), Kraft Cardstock (Stampin' Up), design paper (My Mind's Eye)
Ink: Archival jet black, Distress frayed burlap
Coloured with Twinkling H2O (get them at Whiff of Joy (http://www.whiffofjoy.com/)
button twine Whiff of Joy "vintage linen"
ribbon, Martha Steward star punch, eyelet from Stampin' Up, Crop a dile Stampin' Up
white crackle paint from Ranger dimensional adhesive, double-sided tape
button, hardware Stampin' Up, self-adhesive rhinestones
alphabet punch from Hayda
blogSignature
Related Posts Plugin for WordPress, Blogger...